Personnel
Employees, External Staff, Teams | Add People | Deactivating Personnel | Employee Data | Access RightsEmployees, External Staff, Teams
Employees
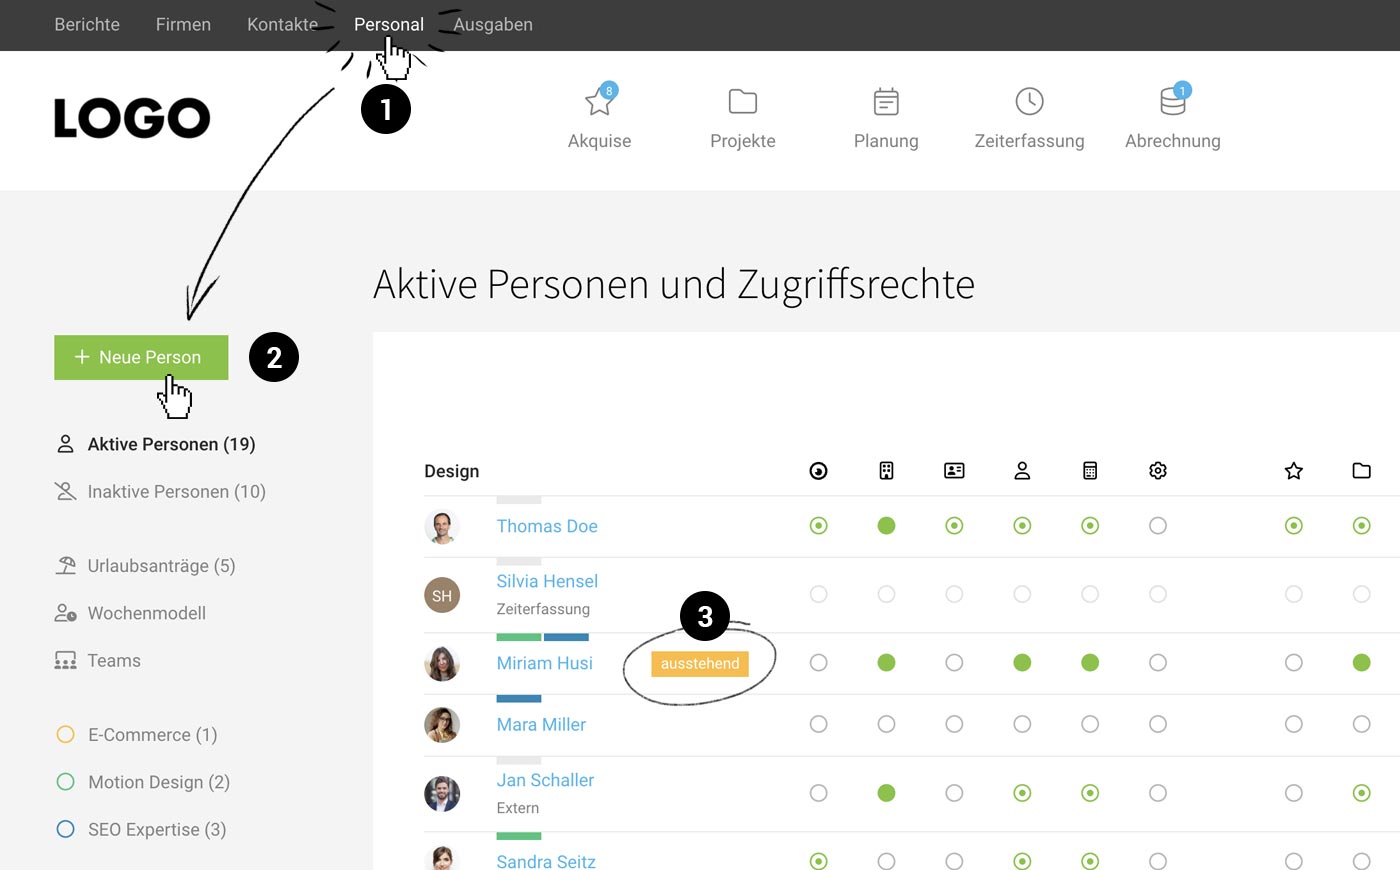
All added users are automatically listed in the submenu "Active Persons" (1).
By default, MOCO assumes the new person is a new employee (hired staff).
By default, MOCO assumes the new person is a new employee (hired staff).
.jpg) (English image not yet available)
(English image not yet available)1) Alle neuen Benutzer sind unter "Aktive Personen" gelistet. 2) Als Extern markierte werden in der Liste entsprechend angezeigt. 3) Unter "Teams" werden die Teams definiert und verwaltet.
External/Freelancers
Freelancers often log their hours directly in MOCO
In this case, select "External" when entering the person in the form.
In this case, select "External" when entering the person in the form.
→ "External" (2) is displayed in the personnel list.
→ External staff are NOT included in company reports.
→ External staff are NOT included in company reports.
→ External staff do not have a holiday account or targets.
Manage costs
External staff can be activated only for specific assignments – MOCO then calculates only those days.
Freelancers not logging hours or unsure about cost management?
Find all the information here
Is the external team or freelancers also using MOCO?
Use project linking.
To track overall progress live, you can easily link external projects
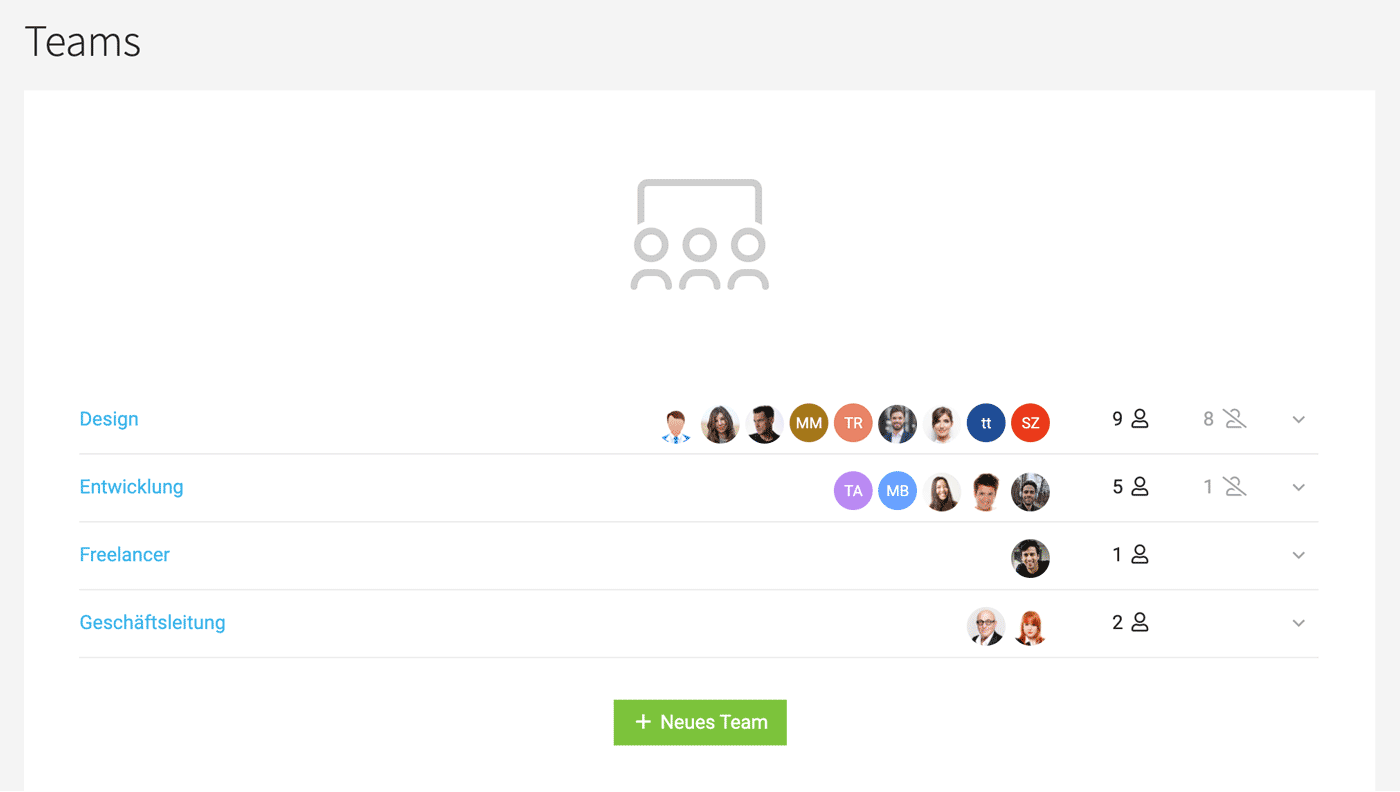
Teams
People are grouped into teams
A person can only be assigned to one team. It's best to use departments or locations for grouping – it's not about temporary project teams.
Teams are defined in the site navigation under "Teams" (top in the illustration No. 3) and can then be selected in the person's form.
A person can only be assigned to one team. It's best to use departments or locations for grouping – it's not about temporary project teams.
Teams are defined in the site navigation under "Teams" (top in the illustration No. 3) and can then be selected in the person's form.
→ Teams structure the views
→ A person with restricted personnel rights can access information about their own team without having access to all individuals.
→ Each team has a team report
 (English image not yet available)
A team cannot be deleted as long as there are employees in it.
→ A person with restricted personnel rights can access information about their own team without having access to all individuals.
→ Each team has a team report
(English image not yet available)A team cannot be deleted as long as there are employees in it.
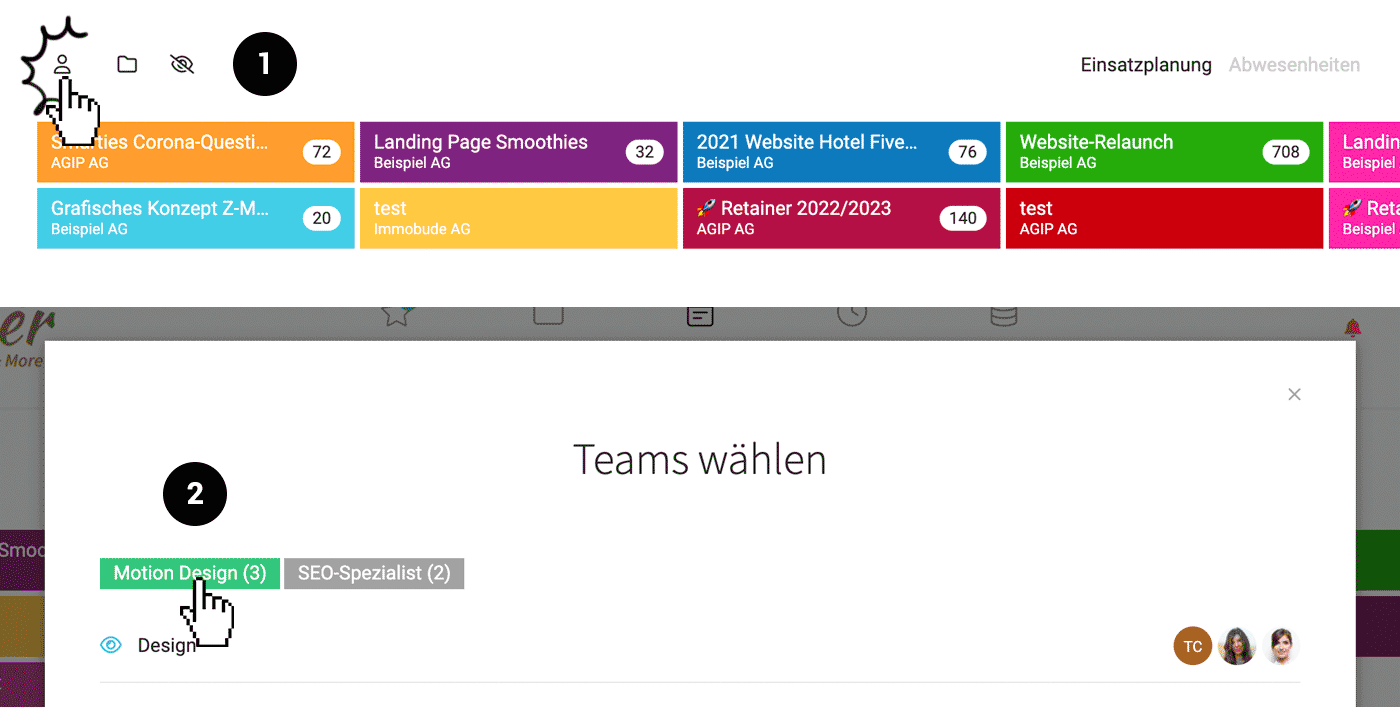
Flexible or Temporary Teams
Filter by labels, e.g., by skills
Under "Personnel," people can be labeled and filtered by temporary teams in planning:
 (English image not yet available)
Filter by project teams
Clicking on the project tile automatically narrows down the planning to the people defined for time tracking in the project – and possibly already planned.
Under "Personnel," people can be labeled and filtered by temporary teams in planning:
(English image not yet available)Filter by project teams
Clicking on the project tile automatically narrows down the planning to the people defined for time tracking in the project – and possibly already planned.
Add People
Add People to the Account
New users are added under "Staff" (1) by clicking on "+New Person" (2). The new users will receive an email with their login details. If an invited user has never logged in, they will remain marked as "pending" (3).
 (English image not yet available)
(English image not yet available)Can't find or forgot login details?
If they can't find their email with the login details, you can resend the login information by clicking on "pending" – or the employee can select "Forgot password" during login.
Checklist
→ Check target hours – immediately after saving and adjust any differing target hours if necessary.
→ Record holiday entitlement (Under the person > Holiday – Tip: use the person switcher at the top right to quickly access the next holiday account)
→ Enter public holidays (Planning > Absences)
→ Assign access rights – immediately after saving or in the central list
→ Assign projects for time tracking (Under the person > Projects > via the "+" at the top right)
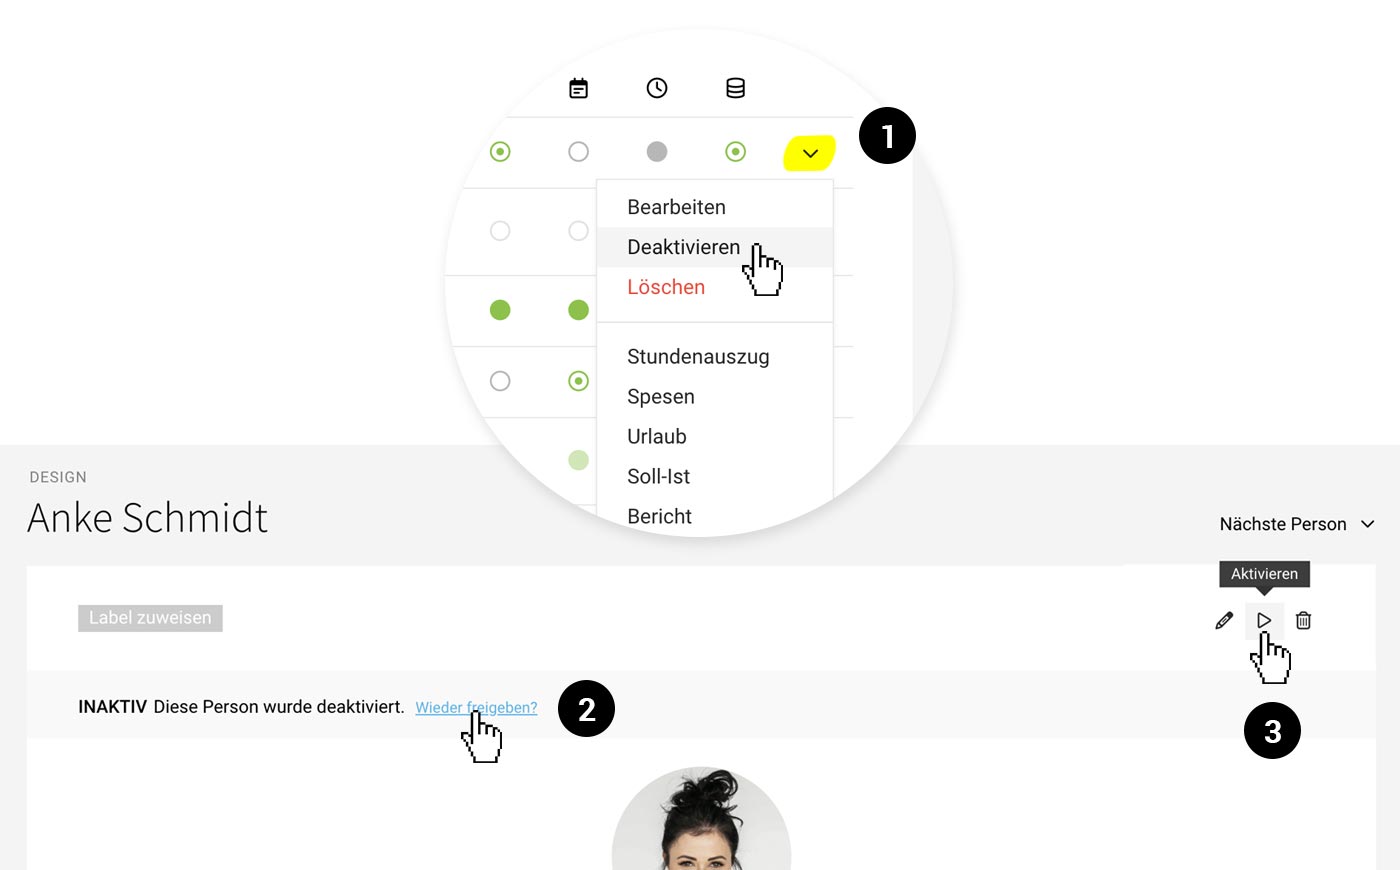
Deactivating Personnel
Deactivating Employees Leaving the Company
This can be done from the list via Dropdown (1) or on the person's detail page at the top right.
When deactivating, ensure the weekly schedule ends correctly on the departure date (MOCO will actively prompt for this step) to ensure MOCO recognizes the end of employment and accurately reflects this in company reports.
The person will then be listed under "Inactive Personnel" in the left sub-navigation.
- All data remains intact
- The person can no longer log in
- Inactive personnel are not included in calculations.
 (English image not yet available)
Under "Inactive Personnel," individuals can also be reactivated (2,3).
Transferring Responsibilities to Another Person
To do this, filter by the person under Companies and Contacts, select all, and apply the bulk action "Change Responsibility." Adjust responsibilities for ongoing projects specifically per project.
Employee Data
Basic Details
When you create a person, their basic details are recorded.
Extended Employee Data
You can extend the basic details individually using Custom Fields – for example, for a National Insurance number, skills, or other bespoke information. You can then search for these across the system (magnifying glass at the top right, or the keyboard shortcut "/").
Calling colleagues while you are out and about works by adding the contact details to your smartphone address book.
For general information, you can also use the free-text field “Additional Info” – a straightforward option that avoids making the form unnecessarily long with custom fields.
Calling colleagues while you are out and about works by adding the contact details to your smartphone address book.
For general information, you can also use the free-text field “Additional Info” – a straightforward option that avoids making the form unnecessarily long with custom fields.
Comments
After saving, the “Comments” section is available below the information. Uploaded files (for example, an employment contract) are listed at the top for quick access. Tip: Enable the AI voice input option.
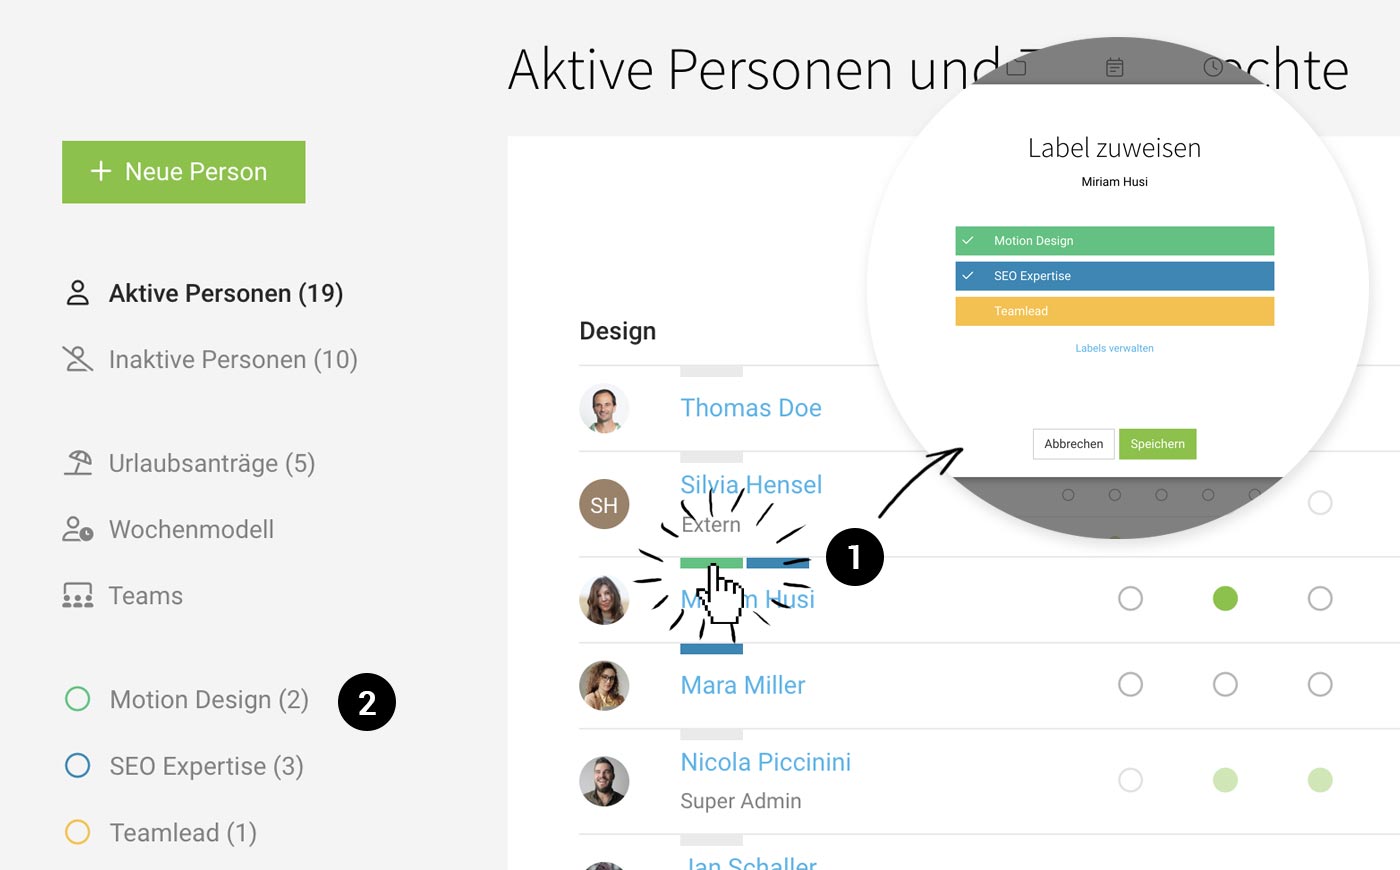
Labels: Categorise, Mark, Tag
People can be tagged with Labels. To do this, click (1) the light grey bar or the coloured labels.
 (English image not yet available)
Benefits:
(English image not yet available)Benefits:
- Short-term marking or categorisation
- Enables targeted filtering (2) via the sidebar
- Labels are also included in the Excel export.
Examples of use:
- Skills: You can quickly filter staff by skills in the staff list and in planning
- Team lead: People with a team lead role can be marked in the list for easier orientation
Access Rights
Under "People", you can assign access rights for the relevant areas in MOCO.
Define User Roles
You can define roles for access rights in the settings. This lets you choose access rights for new users quickly and accurately. In addition to full access, you can also grant restricted access to areas. Further down, you’ll find an overview of what restricted access does in each case.
 (English image not yet available)
In the people list, the deactivated, withdrawn circles show that a user role has been assigned to a person.
(English image not yet available)In the people list, the deactivated, withdrawn circles show that a user role has been assigned to a person.
Optional: Individual Access Rights
Alternatively, access rights can be assigned individually. In this case, rights for each area are managed directly in the people list.
Tip: Using Switch User, you can easily check what a person’s interface looks like after setting their permissions. For security reasons, you cannot switch to the account owner’s view. Switching to accounts with higher permissions is also not possible for security reasons.
Tip: Using Switch User, you can easily check what a person’s interface looks like after setting their permissions. For security reasons, you cannot switch to the account owner’s view. Switching to accounts with higher permissions is also not possible for security reasons.
 (English image not yet available)
Overview of Access Rights
Reports
Restricted Access
- The person can only see the people-related reports "Time Tracking, Planning and People".
Restricted Access + no full access to "People"
- The person can only see the people-related reports "Time Tracking, Planning and People" for their own team.
→ Contacts
Restricted Access:
- The person can only view contacts
- The person can create and edit new contacts
→ People
Restricted Access:
- The person can only manage their own team, and cannot change any access rights
→ Purchases
Restricted Access:
- View and edit only purchases they created themselves
- View and edit only personal expenses claims addressed to them
- Only assign planned purchases if they are set as the responsible person
→ Sales: Leads & Quotes
Restricted Access:
- The person can only manage their own leads (as the responsible person), and create new leads
- The person can manage their own quotes (as the responsible person), and create new quotes
- The person can view and edit quotes in their own leads & projects (as the responsible person)
→ Projects
Restricted Access:
- The person can only manage their own projects (project lead) and create new projects
- No access to Project Groups
+ Restricted access to "Billing"
- The person only sees billing figures for their own projects.
No Access Rights
- Everyone sees the projects assigned to them (for time tracking) listed in their profile under "Projects"
→ Billing
Restricted Access + Restricted access to "Projects"
- The person can only bill their own projects
Restricted Access
- Under "Billing", they only see invoices listed for which they already have access as the project lead
No access + Restricted access to "Projects"
- Under "Projects", the person does not see any billing-relevant figures
→ Planning
Restricted Access
- Only edit their own planning
- Only see their own Target-Actual
Without Access
- Info about their own planning via export to an external calendar
- Info about their own planning via the Weekly Email (enable in the profile)
- In time tracking, all planning entries are shown as suggestions. This way, everyone can see which projects are planned for the day, and start time tracking directly via the stopwatch, or create a time entry directly from the suggestion. More on time tracking on tasks
Absences
- Be able to manage all absences
→ Access rights to "People" required - Users can enter/delete their own absences
→ Select this in the settings under "Planning" - Employees do not enter absences themselves, and request leave & sickness
→ Select this in the settings under "Planning"
More information on absence requests