Billing
General | Invoices | Cancellation | Payment Reminders | QR Invoice (CH) / QR Code | eBill (CH) | e-invoices | Not Subject to VAT | Debt CollectionGeneral
Settings > Billing > General
Billable Items
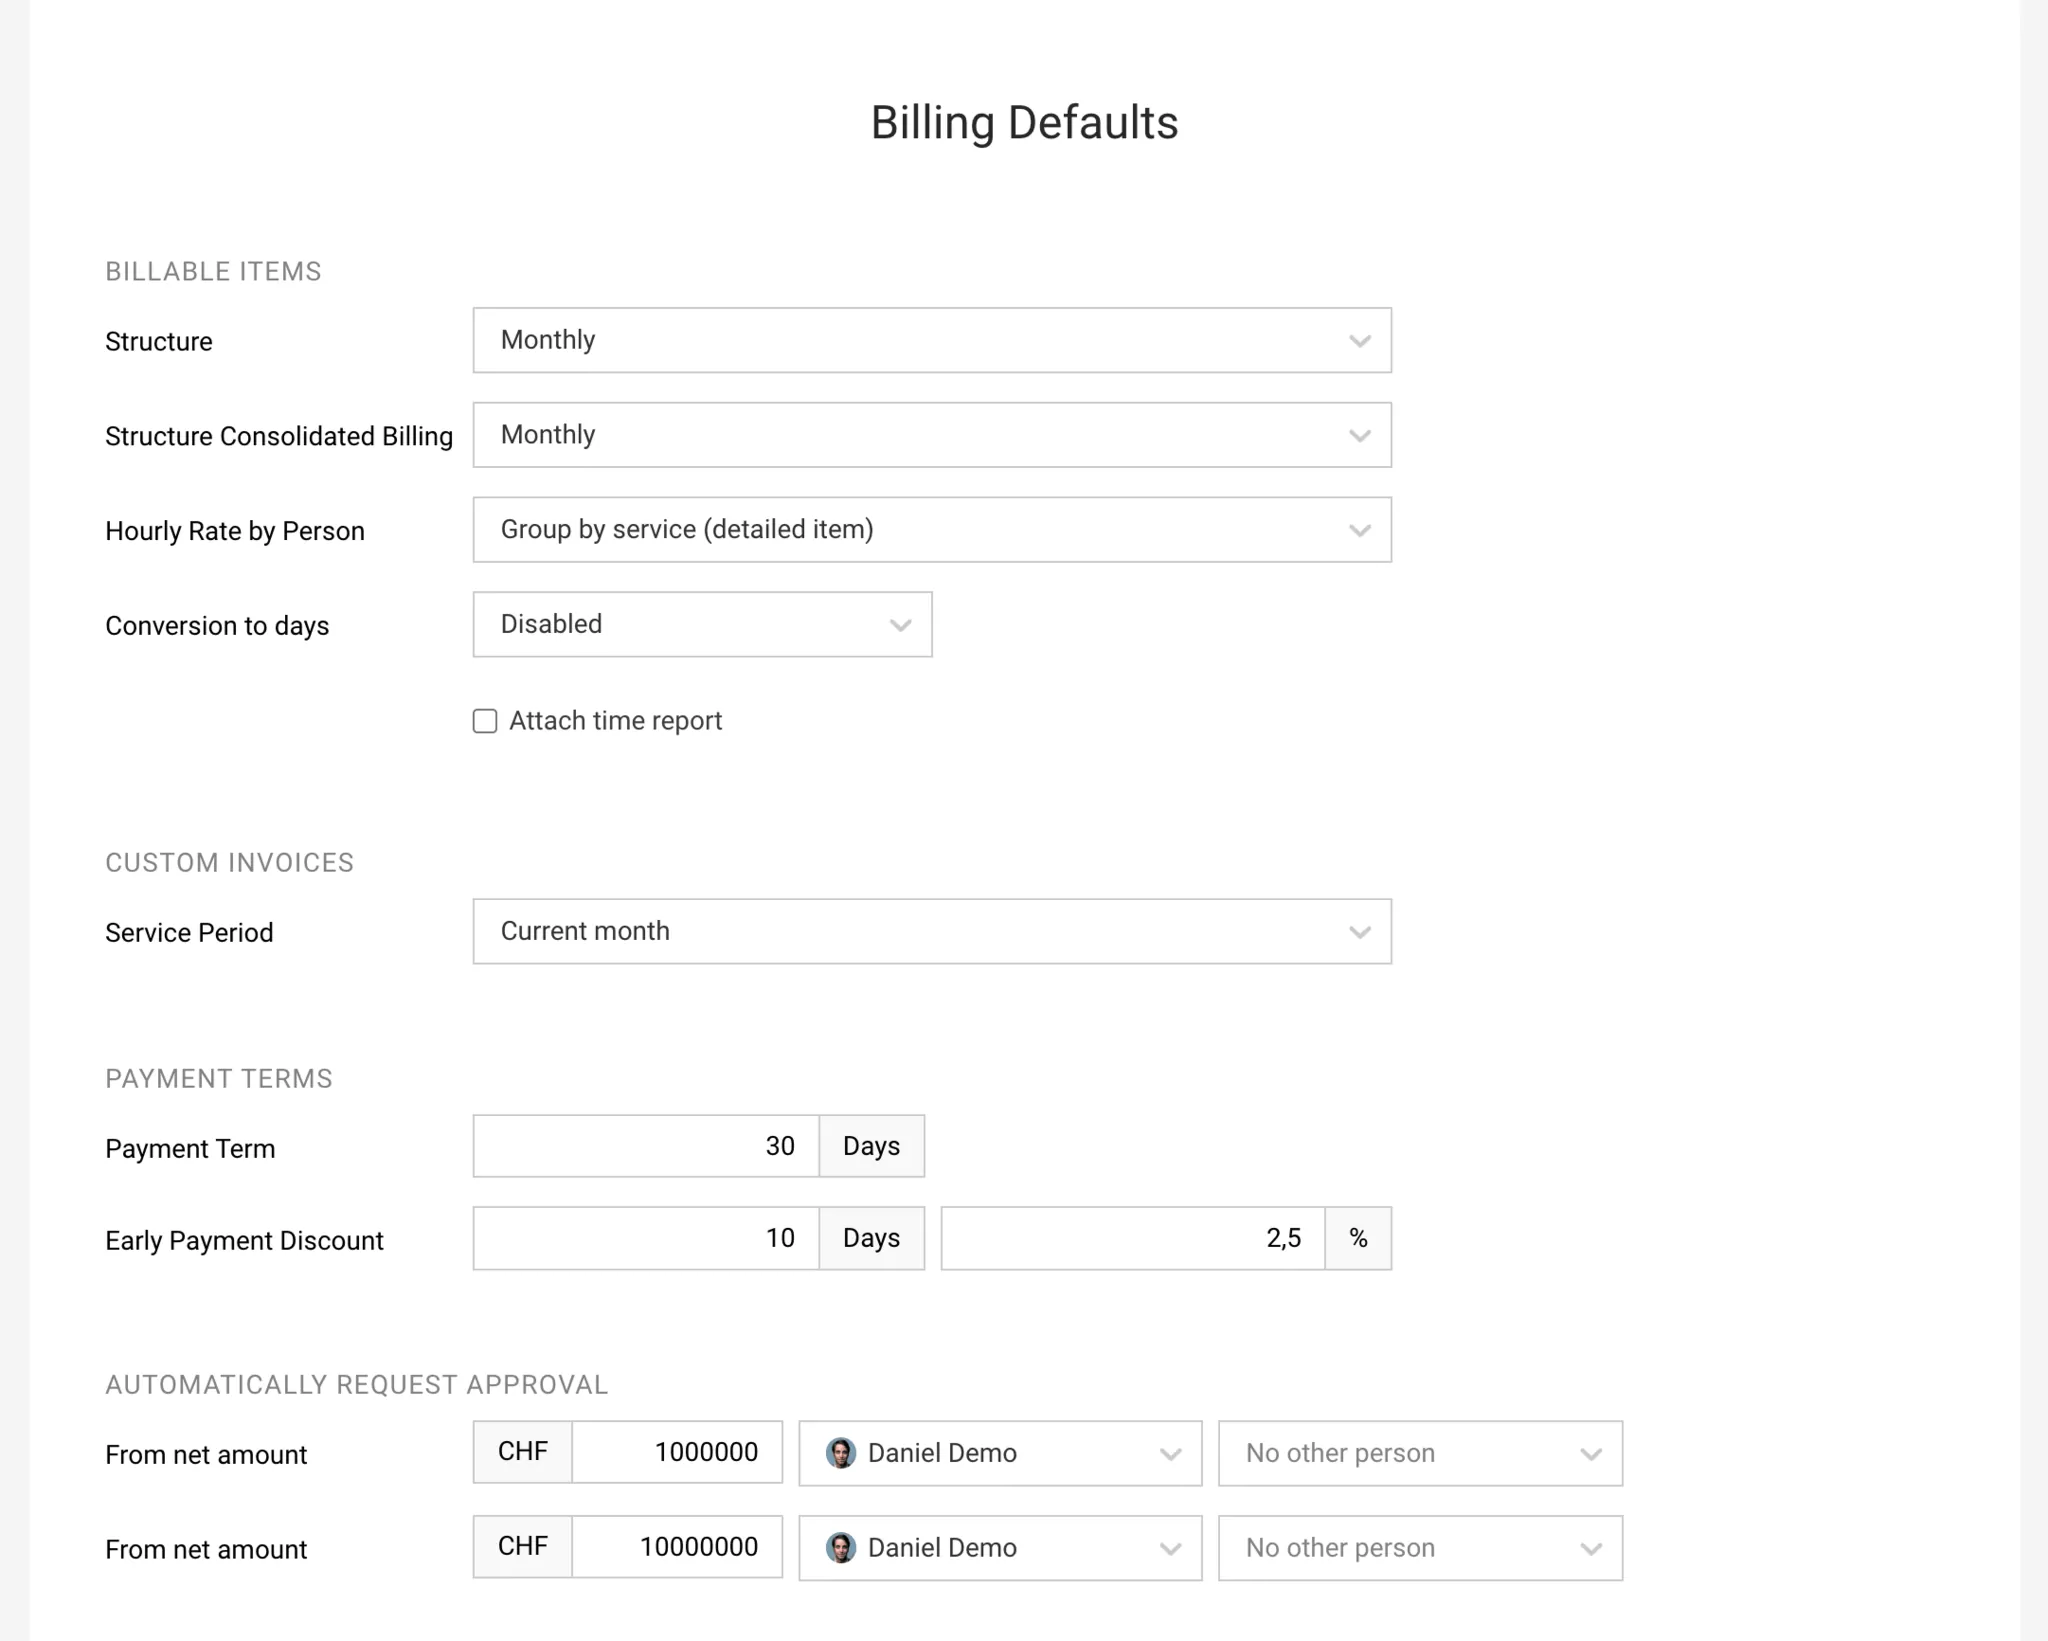
Structure
For automatic Invoice creation, MOCO offers the following options:
- Monthly Group by month
- Detailed Each individual time entry is added to the Invoice
- Compact No grouping by month
When you select the "Create Invoice" button, MOCO always uses the default set here. When creating an Invoice, you can still choose a different option (via the dropdown).
Hourly Rate by Person
If "Hourly Rate by Person" is selected in the project, MOCO offers the following options when Billing hours:
- Group by person
- Group by service (detailed line item) Shows the service, total, and number of hours
- Group by service (fixed-fee line item) Shows the service and total
Convert to Days
In projects billed by effort (Time & Material), hours are billed directly by default. If your company bills day rates only, you can enable conversion to days here and specify the conversion factor (hours/day). Day rates can be applied on the Invoice only, or additionally on the Timesheet.
Timesheet
When Billing by effort, the relevant Timesheet is created automatically. You can define here whether the Timesheet should be included in the PDF by default – but you can override this for a Client or in the project under "Billing" > "Billing Info".
You can also choose whether the Timesheet should be sent (integrated directly into the PDF) when creating an Invoice, at the end of the form.
You can also choose whether the Timesheet should be sent (integrated directly into the PDF) when creating an Invoice, at the end of the form.
Neutral Invoices
Service Period
For most Invoices, MOCO can derive and suggest the period from the available data. For neutral Invoices – i.e. blank Invoice forms that you fill in manually or create by copying templates – choose your preferred default here.
Payment Terms
Payment Due Date
The globally defined payment term applies to all Invoices. You can set a different term at Client level.
Early Payment Discount
This is where the default early payment discount terms are defined. They can be overridden for a Client or on an Invoice.
Automatically Request Approval
For the approval workflow you can set up automation here by adjusting the individual minimum amount.
Invoices
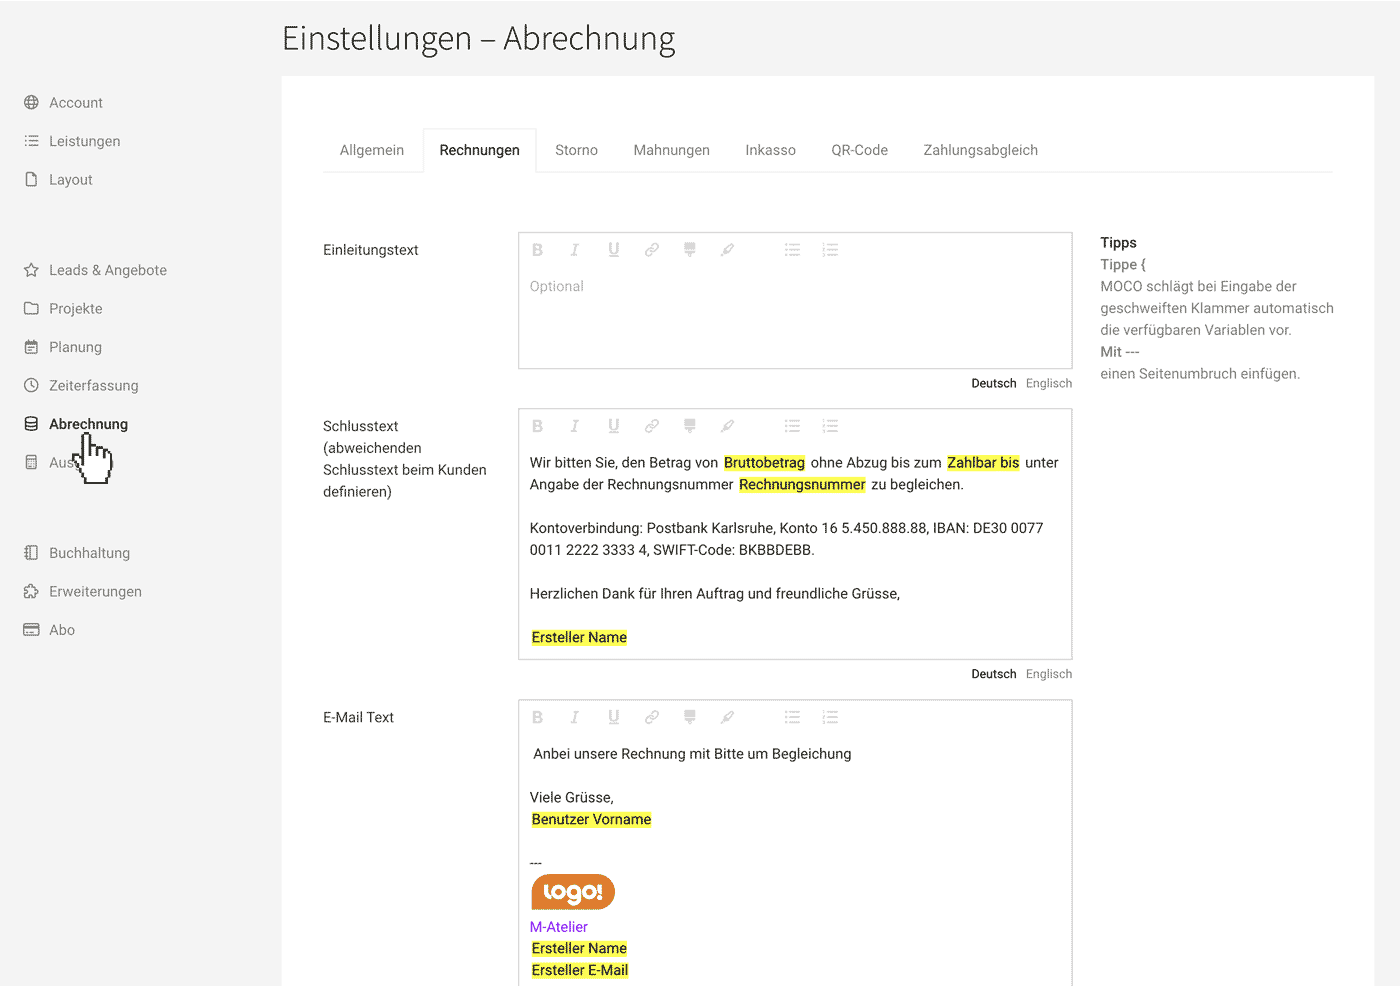
Intro and Closing Text, Email Text & Signature
Settings > Billing > Invoices
 (English image not yet available)
(English image not yet available)Tip: Leave the intro text blank If you send invoices by email, you don’t need an intro text. It only makes the invoice unnecessarily long and adds little value. Instead, it’s better to add a “Thank you for your business” in the closing text after the payment instructions.
Insert variables
Variables are available. You can open them by typing “{” (type alt + “(”). (see note 1)
The salutation line uses fallbacks if it hasn’t been set individually for the contact.
Insert a logo for the email signature
A signature image previously defined under Account > Email can also be inserted via variables in the email text field.
Insert a page break
You can insert a page break in the intro and closing text using “---” (see note 1).
Your own UID
It’s best to place your UID or VAT number in the sender details on the letterhead. Otherwise, include it in the default closing text.
English
The English texts you can predefine here are used when “Correspondence in English” is selected for the client in the form.
Different Defaults for a Client
Closing text, payment terms, and hourly rates can be overridden for individual clients
 (English image not yet available)
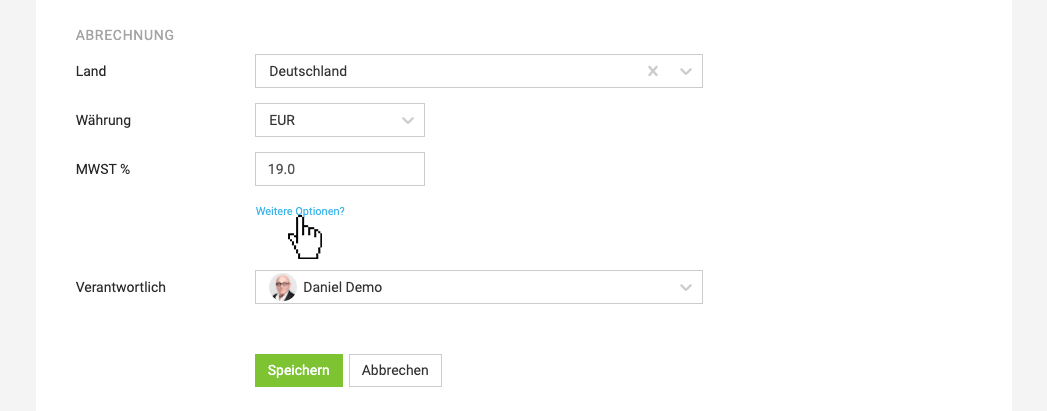
(English image not yet available)You can still adjust the defaults on the invoice at any time. You select the default tax rate at account level in Settings under “Accounting”
Info Block
You decide which document information is shown on the invoice in the info block in Settings under Layout > Quotes & Invoices. Alternatively, you can also add information as variables in the text (to insert, type “{”).
Cancellation
Settings > Billing > Cancellation
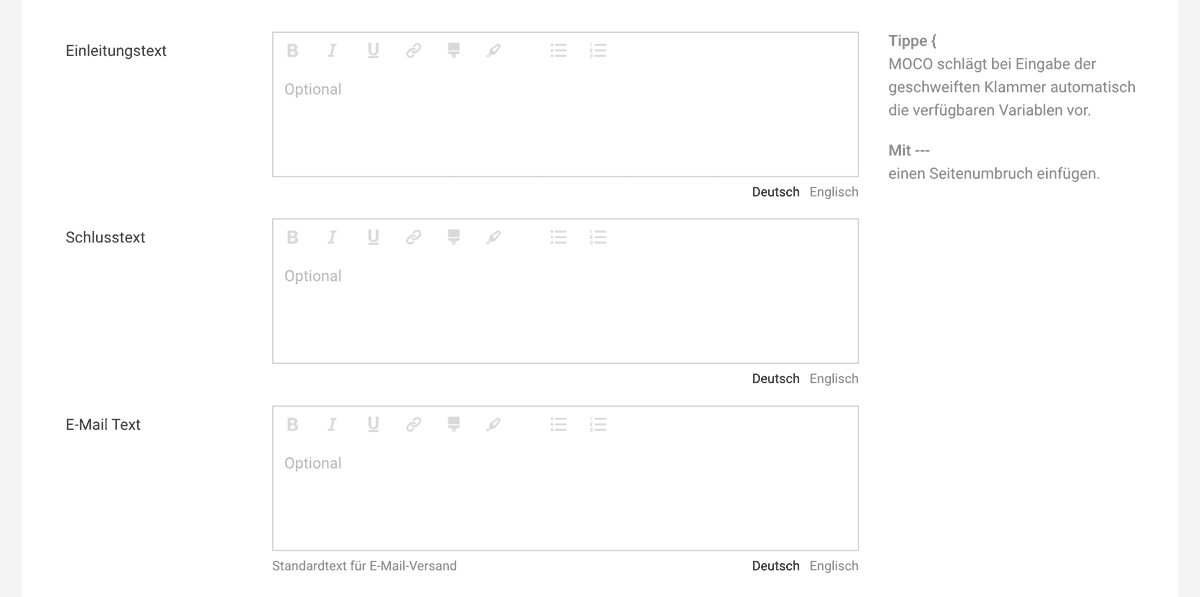
Here you can enter the standard text for cancellation invoices and invoice corrections.
More on cancellation invoices, invoice corrections vs credit notes
Here you can enter the standard text for cancellation invoices and invoice corrections.
More on cancellation invoices, invoice corrections vs credit notes
 (English image not yet available)
Payment Reminders
Settings > Billing > Payment Reminders
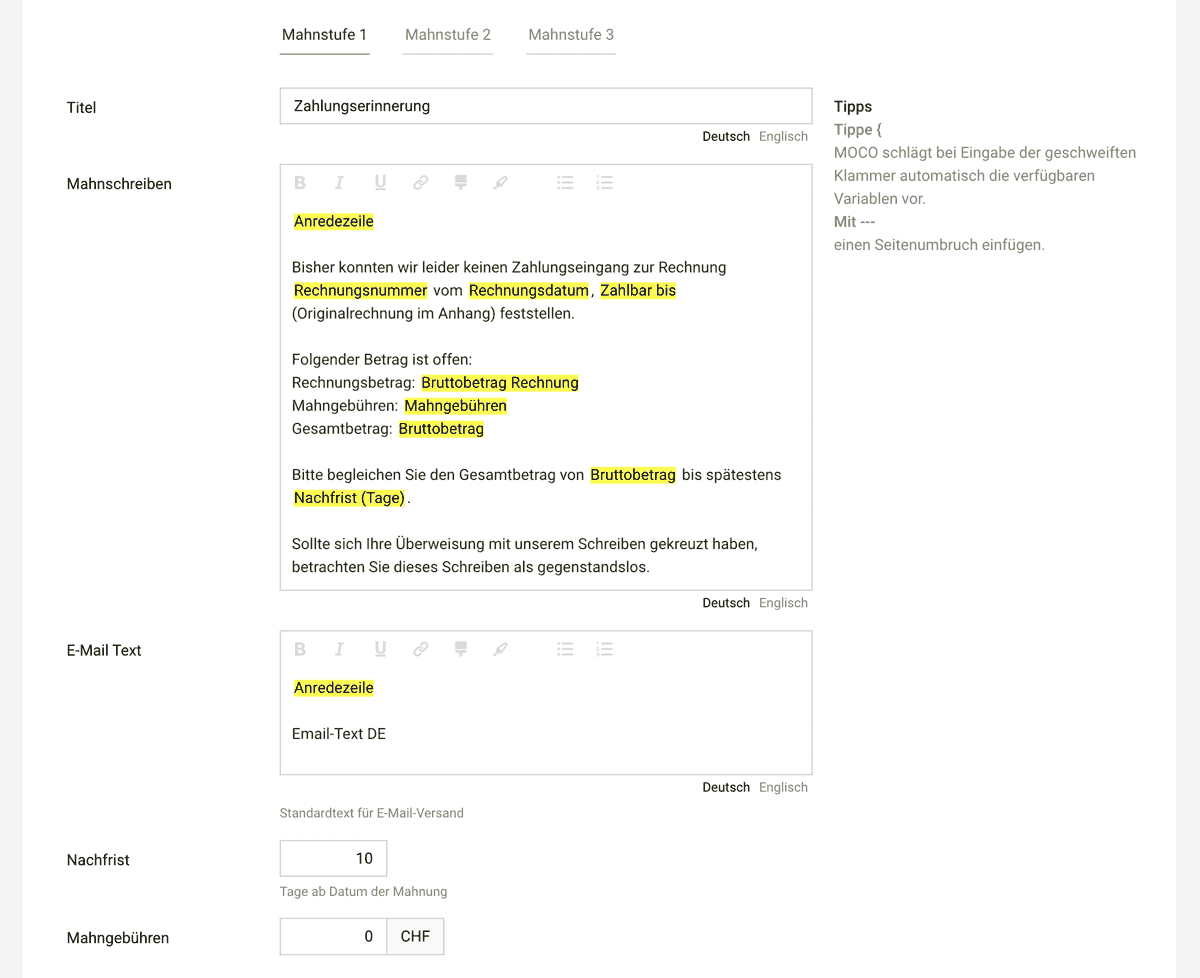
Here you can predefine the text for your reminder stages. These are required, as MOCO automatically fills in the next stage whenever you create a reminder.
 (English image not yet available)
Create payment reminders individually or all at once with a single click
Here you can predefine the text for your reminder stages. These are required, as MOCO automatically fills in the next stage whenever you create a reminder.
(English image not yet available)Create payment reminders individually or all at once with a single click
QR Invoice (CH) / QR Code
Settings > Billing > QR Invoice & eBill
Scan instead of typing: a QR code on the invoice makes it easier for invoice recipients to pay. Your client scans the QR code with their banking app and pays quickly, securely, and without errors, as there’s no need to type anything in.
Swiss QR Invoice
The QR invoice replaced the previous orange and red payment slips as the standard in October 2022. There are two types of QR invoice:
The QR invoice with QR-IBAN replaces the previous orange payment slip. The QR reference corresponds to the former ESR reference and is used to match invoices with incoming payments. The so-called QR-IBAN replaces the previous 9-digit ESR participant number. In other words, instead of 01-... the payment part with the QR code now shows an IBAN. This QR-IBAN is issued by the bank and must be entered in MOCO when setting up the QR invoice.
The QR invoice with a standard IBAN covers simple invoicing – previously the red payment slip: the reference is not structured.
The QR invoice with a standard IBAN covers simple invoicing – previously the red payment slip: the reference is not structured.
Setting Up the QR Invoice
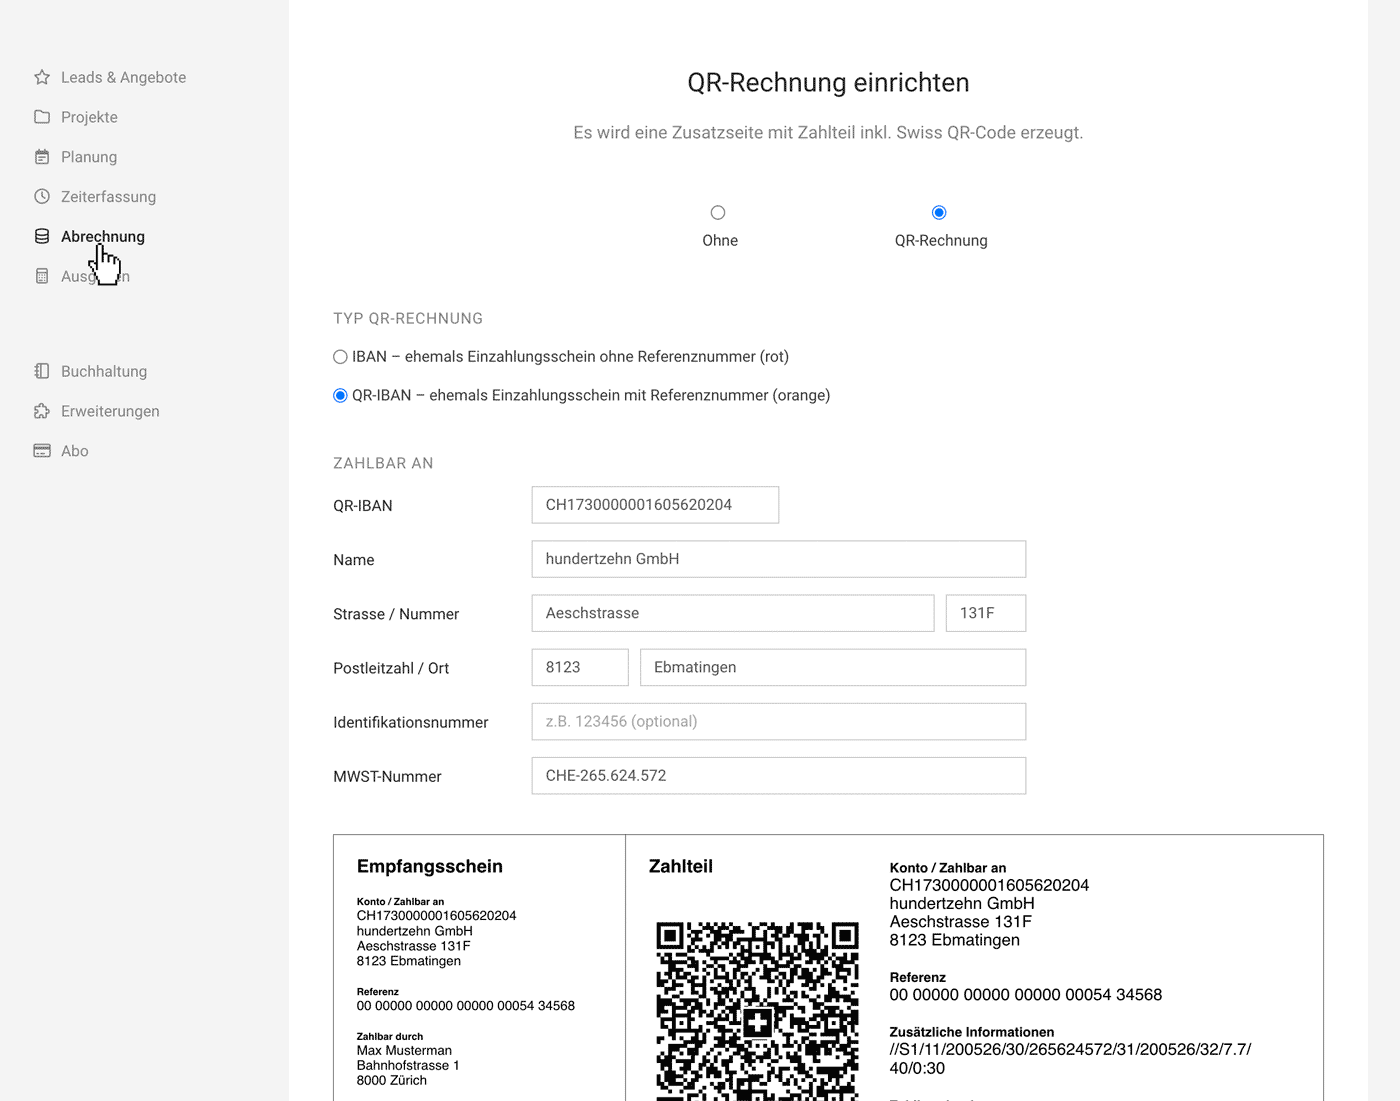
1. In Settings, go to "Billing" > "ESR/QR Invoice" and choose the QR invoice type.
2. To order a QR-IBAN (= formerly the orange payment slip), contact your bank.
3. Enter the QR-IBAN or IBAN and all other required details.
Below, you’ll see a preview of the QR payment part (4), which is then added automatically to every invoice.
 (English image not yet available)
An invoice must meet the following requirements for a QR invoice to be created:
Below, you’ll see a preview of the QR payment part (4), which is then added automatically to every invoice.
(English image not yet available)An invoice must meet the following requirements for a QR invoice to be created:
- Recipient address complete and error-free
- Currency CHF
- Recipient in CH or LI
- Invoice is not a draft
Automatic payment reconciliation via the reference number is possible using a camt file!
Further information: Cross-border invoices & QR code
Further information: Cross-border invoices & QR code
EPC QR Code (GiroCode) International
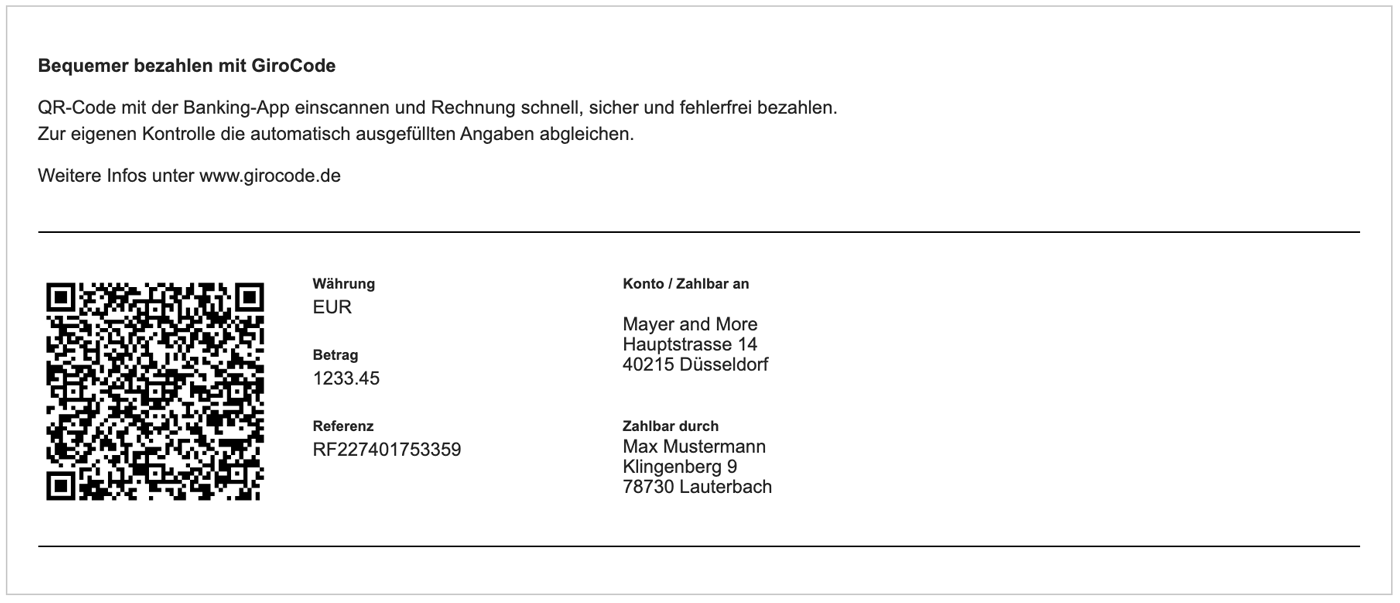
All other accounts outside Switzerland can create their invoices with the EPC QR code (GiroCode).
 (English image not yet available)
Benefits at a glance
(English image not yet available)Benefits at a glance
- Simplicity and convenience encourage invoice recipients to pay immediately via mobile banking and at self-service terminals at banks and savings banks.
- Error-free, complete transfer of invoice data.
- Can be used for digital and paper invoices.
How do I activate the GiroCode?
In MOCO Settings, go to "Billing" > "QR Code", enable the option, and fill in the bank transfer details.
In MOCO Settings, go to "Billing" > "QR Code", enable the option, and fill in the bank transfer details.
Other
Can the reference number include the invoice number?
The reference number uses the invoice number without letters or special characters: "RF" + check digits + invoice number (example: RF35220601). Please let us know via the in-app service if you still have the previous version ("RF" + check digits + invoice ID – example: RF3567554) set up and would like to switch.
Searching by reference number:
You can search for the reference number in MOCO (global search and via the "Search term" field in the invoice list filter).
The reference number uses the invoice number without letters or special characters: "RF" + check digits + invoice number (example: RF35220601). Please let us know via the in-app service if you still have the previous version ("RF" + check digits + invoice ID – example: RF3567554) set up and would like to switch.
Searching by reference number:
You can search for the reference number in MOCO (global search and via the "Search term" field in the invoice list filter).
eBill (CH)
Settings > Billing > QR Invoice & eBill
eBill is a payment method for invoices in Switzerland. With eBill, your clients no longer receive their invoices by post or email, but directly in their e-banking. There, they can review them in just a few clicks and pay straight away.
Benefits of eBill
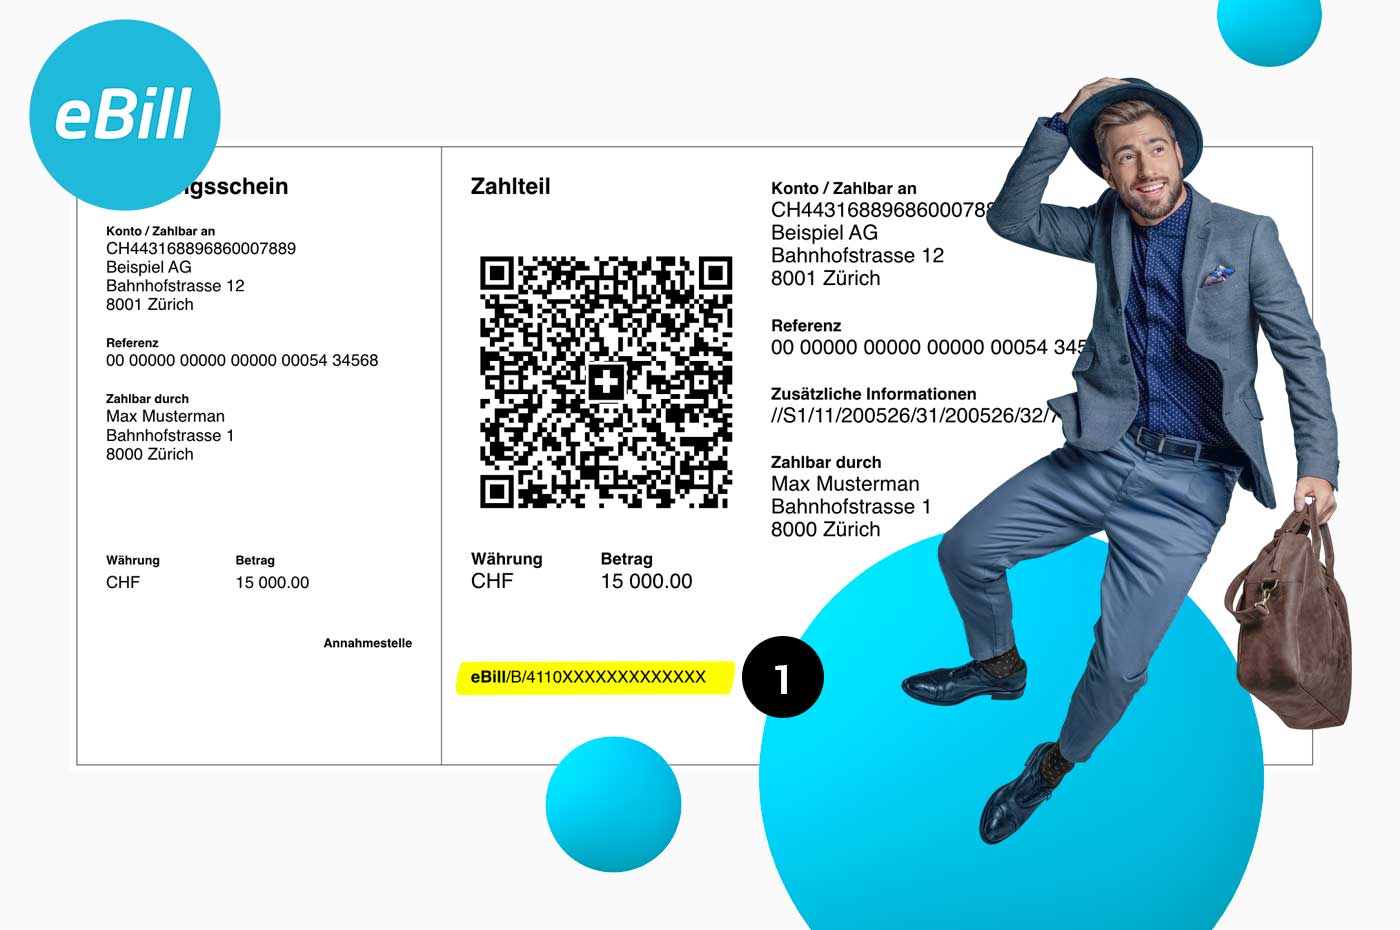
- Each client decides in their e-banking whether they want to pay your invoices using the eBill method. Others will simply see an additional note on their payment slip (see Figure 1).
 (English image not yet available)
- Payments can be transmitted quickly, accurately, and reliably.
- Your client perceives the invoice as secure and trustworthy.
- You are seen as forward-thinking when you offer a modern payment option.
- Less paper use thanks to the digital invoicing process (if you previously sent invoices by post).
More information on activating and using the eBill payment method for your QR invoices.
e-invoices
Settings > Billing > e-invoices
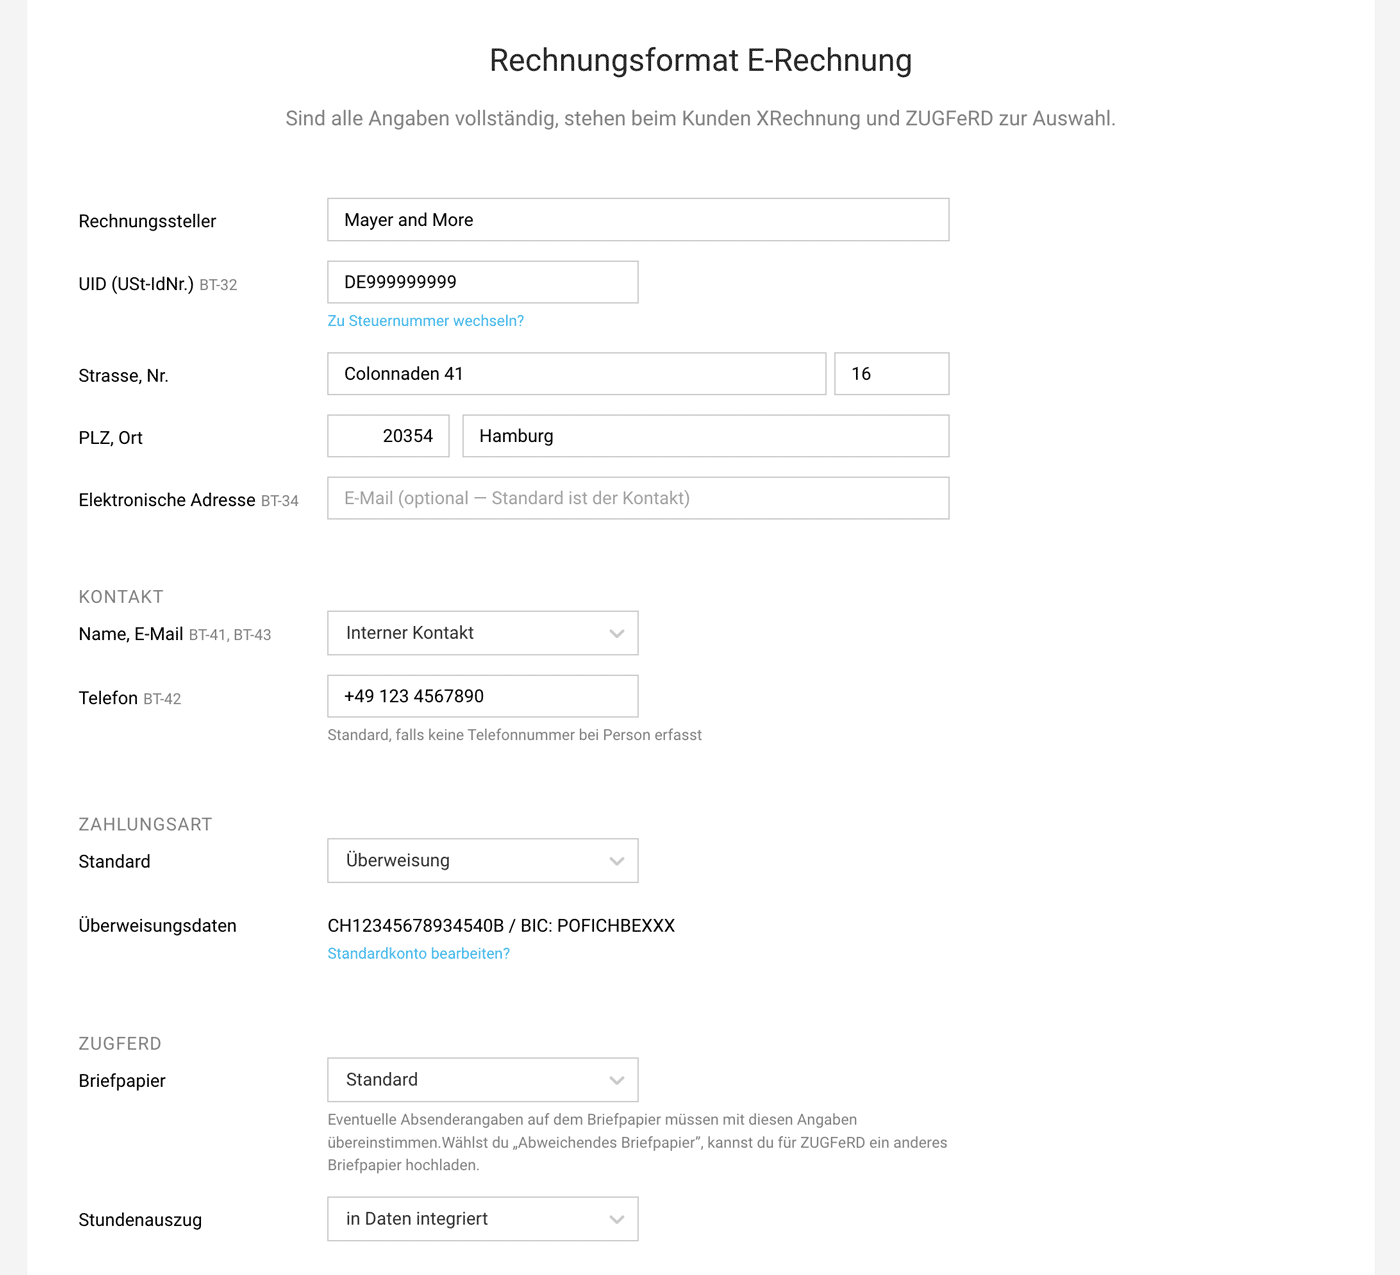
In Germany, there are legal requirements for using e-invoices. Here you enable the e-invoice formats for sending invoices and store the details that will be included in every e-invoice. You then decide which format a client receives in the client record.
 (English image not yet available)
Sender Details
Your sender details as the invoice issuer (seller) – including contact details – must be complete and correct.
By default, the contact’s email address is included in the e-invoice as the Electronic Address (BT-34). You can override this here by entering a different email address.
“BT” stands for “Business Term” – the name of the individual data fields in the European standard for e-invoices. If there are any queries, your client or their accounts team may sometimes refer directly to one of these numbers.
Overview of BT Fields in MOCO
By default, the contact’s email address is included in the e-invoice as the Electronic Address (BT-34). You can override this here by entering a different email address.
“BT” stands for “Business Term” – the name of the individual data fields in the European standard for e-invoices. If there are any queries, your client or their accounts team may sometimes refer directly to one of these numbers.
Overview of BT Fields in MOCO
Set the Default Payment Method
Set which payment method should be used by default. This default is automatically applied to all clients for whom you select an e-invoice format (you can adjust it if needed). You can also change the payment method directly on the invoice.
- Bank Transfer:
Choose this option if you want to transmit your bank details with the e-invoice – this is usually the right choice for project-based work. - Neutral:
Choose “Neutral” if your clients use different payment methods, e.g. direct debit. In this case, MOCO does not transmit any bank details with the e-invoice. You can include notes on how to pay in the closing text – this is also transmitted with the XRechnung.
Multiple Payment Accounts
If you work with more than one account, you can add multiple payment accounts here and set one as the default. For an individual invoice, you can then select a different one if needed. The account transmitted is always the one set on the invoice.
Letterhead and Attachments in ZUGFeRD Format
Any sender details on your uploaded letterhead must match the details entered here. If you select “Different Letterhead”, you can upload a different letterhead for ZUGFeRD (a new Type column will be shown).
By default, attachments are integrated only into the XML part of the e-invoice. Your client can then read and check them using suitable software. Alternatively, you can also attach the timesheet and other attachments to the PDF part of the e-invoice. Please note that this can double the file size.
Do Not Duplicate Bank Details
If you have selected “Bank Transfer”, MOCO transmits your bank details in a structured format. If the same details are also permanently shown on the letterhead or in the closing text, your client has two sources – and, if you change accounts, one of them will be out of date. We therefore recommend not including any bank details on the ZUGFeRD letterhead.
By default, attachments are integrated only into the XML part of the e-invoice. Your client can then read and check them using suitable software. Alternatively, you can also attach the timesheet and other attachments to the PDF part of the e-invoice. Please note that this can double the file size.
Do Not Duplicate Bank Details
If you have selected “Bank Transfer”, MOCO transmits your bank details in a structured format. If the same details are also permanently shown on the letterhead or in the closing text, your client has two sources – and, if you change accounts, one of them will be out of date. We therefore recommend not including any bank details on the ZUGFeRD letterhead.
Not Subject to VAT
If you fall under the small business regulation, you are not required to show VAT on the invoice. A corresponding note informs the recipient of the invoice about this particularity.
Debt Collection
Settings > Billing > Debt Collection
 (English image not yet available)
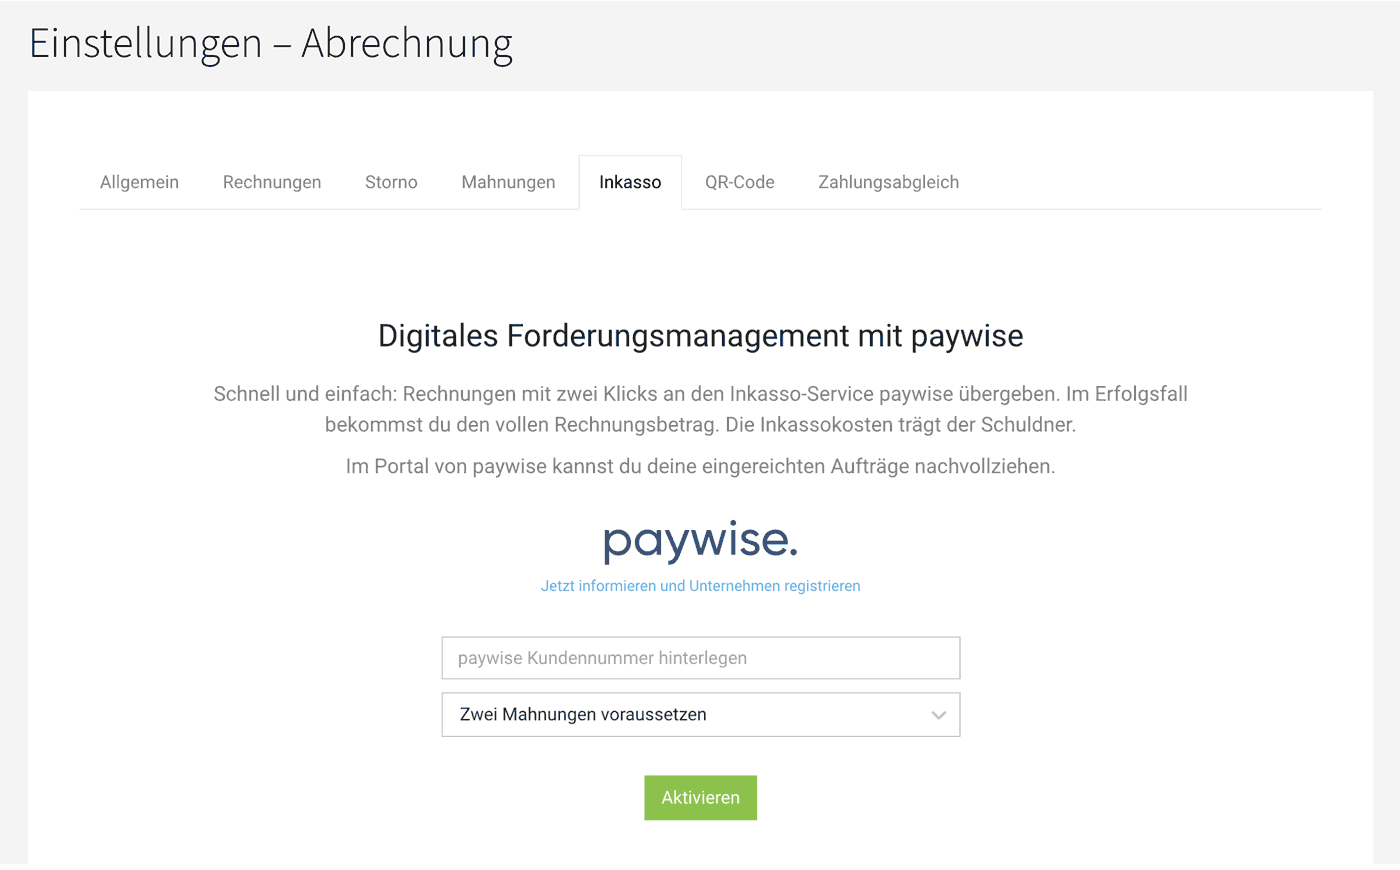
(English image not yet available)Ordered, delivered – but your client still won’t pay the invoice? With two clicks, you can hand an invoice over to the debt collection service.
Free Service
The service is free for you as a MOCO user. The debtor pays the debt collection fees. The service is provided in partnership with the debt collection company paywise.
Activate
Once you have activated the debt collection option, you can use the “Debt Collection” button at the top right of the invoice. To activate it, you will need a paywise customer number. Register for a paywise account in advance. Registration only takes a few minutes.
Go Straight to paywise Registration
Go Straight to paywise Registration
Submit an Invoice
1. On the invoice, click the orange “Debt Collection” button.
2. Add any information about what has happened so far, and confirm the request.
3. The invoice, including relevant information, is transferred to paywise.
4. Within a few minutes, you will receive an email confirmation of receipt from paywise.
In your paywise account, you can track all requests.
More About the Functionality
2. Add any information about what has happened so far, and confirm the request.
3. The invoice, including relevant information, is transferred to paywise.
4. Within a few minutes, you will receive an email confirmation of receipt from paywise.
In your paywise account, you can track all requests.
More About the Functionality
Conditions
- The debtor and/or creditor must be based in Germany
- The invoice payment deadline (or the final payment reminder) has passed
- The invoice is not time-barred (3 years)
- Communication exclusively in German
- Legal proceedings exclusively in Germany
What exactly does “free” mean?
Paywise does not charge any membership or sign-up fees, and there is no subscription.
You still do not incur any direct costs for the debt collection service. If your debtor pays the invoice amount, you receive 100% of the invoice amount. In addition to the invoice amount, your debtor must pay a debt collection fee (amounts are set by law).
If the debtor is insolvent, however, you do not have to pay any fees to paywise.
If paywise is not successful out of court, formal court dunning proceedings are initiated. To avoid unnecessary costs, paywise obtains a SCHUFA credit report in advance and only proceeds if there are no negative markers, or if you want them to. As the court charges fees for the proceedings, you must pay these in advance. For claims under €1,000, this is €36. Bailiffs and the enforcement court also charge fees, usually between €40 and €120 per measure, which paywise also bills as an advance payment. Paywise then seeks to recover these advance payments from the debtor, but there is a risk if the debtor is insolvent.
Paywise
You still do not incur any direct costs for the debt collection service. If your debtor pays the invoice amount, you receive 100% of the invoice amount. In addition to the invoice amount, your debtor must pay a debt collection fee (amounts are set by law).
If the debtor is insolvent, however, you do not have to pay any fees to paywise.
If paywise is not successful out of court, formal court dunning proceedings are initiated. To avoid unnecessary costs, paywise obtains a SCHUFA credit report in advance and only proceeds if there are no negative markers, or if you want them to. As the court charges fees for the proceedings, you must pay these in advance. For claims under €1,000, this is €36. Bailiffs and the enforcement court also charge fees, usually between €40 and €120 per measure, which paywise also bills as an advance payment. Paywise then seeks to recover these advance payments from the debtor, but there is a risk if the debtor is insolvent.
Paywise