Accounting
General: Choose Option | General: Default Accounts and Tax Codes | Accounts Receivable | Creditors | Revenue | Expenditures | Cost Centres | Tax RatesGeneral: Choose Option
What’s the benefit of the Billing area?
MOCO focuses on project-based work and provides straightforward accounting preparation that won’t get in the way of day-to-day work, reduces the workload for your accounts, and keeps everything clearly in view.
▶️ Tobias from MOCO introduces the optional accounting features in this video
Settings > Billing > General
Settings > Billing > General
Once you’ve selected an accounting option, an additional “Accounting” sub-item appears under “Billing” and “Purchases” for the accounting export (data and receipts).

- Neutral
- DATEV Format
- DATEV Unternehmen online (Direct Transfer)
- BMD (AT)
- Abacus (CH)
- Banana (CH)
- Bexio (CH)
- Xero (UK)
- QuickBooks (UK)
Neutral (CSV)
A neutral accounting export in CSV format, provided to your accounts team for import together with the receipts downloaded in bulk.
Custom extension
The CSV is automatically extended with custom fields (invoice level – Single Select and Single-Line Text).
Custom extension
The CSV is automatically extended with custom fields (invoice level – Single Select and Single-Line Text).
DATEV Format (CSV)
CSV export in DATEV format (known as a “Buchungsstapel”), provided to your tax adviser together with the receipts downloaded in bulk. Your tax adviser imports the Buchungsstapel into DATEV (e.g. Kanzlei Rechnungswesen and DATEV Mittelstand Faktura mit Rechnungswesen).
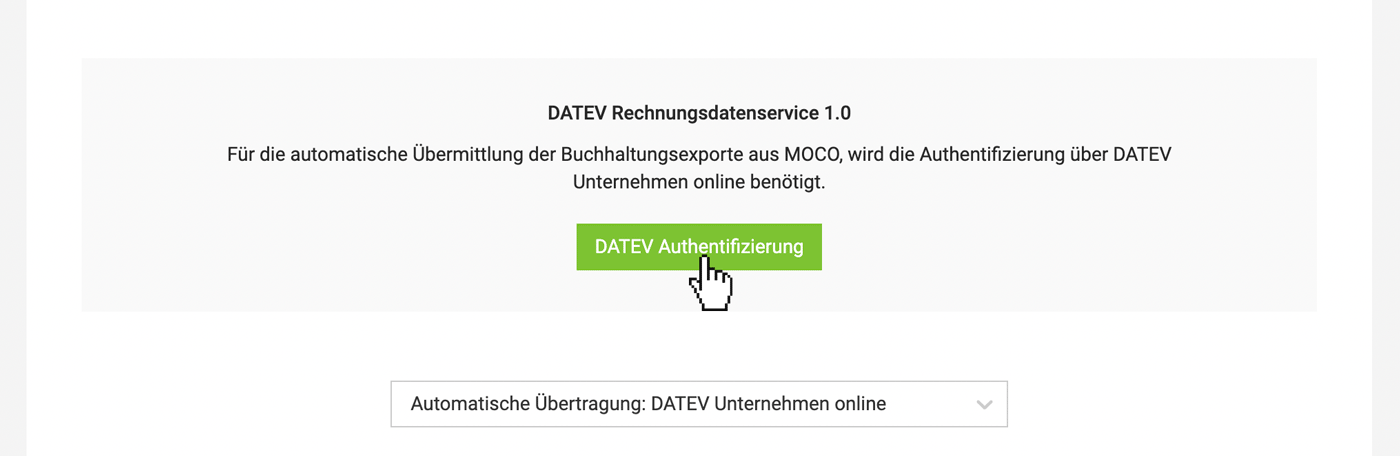
DATEV Unternehmen online (Direct Transfer)
Invoice data, including receipts, is transferred directly to DATEV Unternehmen online with a single click. Once provided, you or your tax adviser can then retrieve the data as booking suggestions, depending on whether financial accounting with DATEV is handled by you or your tax adviser.
How to set it up:
How to set it up:
- Your tax adviser has ordered and set up the DATEV Rechnungsdatenservice 1.0 for you in DATEV. If you do your own financial accounting, you can set up Rechnungsdatenservice 1.0 yourself.
You can find more information » here. As the setup in DATEV isn’t straightforward, DATEV offers support with ordering the data service and setting it up in DATEV. - In DATEV Unternehmen online, the extended editing mode is enabled (see illustration).
 (English image not yet available)
 - After selecting and saving “Direct Transfer to DATEV Unternehmen Online”, DATEV authentication is required. For this, you need DATEV SmartLogin. You will receive access to DATEV SmartLogin once the interface has been successfully ordered. If you already have a DATEV SmartLogin account, it will be granted the necessary permissions as part of the setup process.
 (English image not yet available)
 - Once the connection is set up, create an export. With the export, DATEV issues a “long-term token”, so you don’t have to log in again every time.
- Use the help page for issues and error messages.
BMD (CSV)
For companies in Austria
Export designed for the BMD accounting software (Austria). Incoming and outgoing invoices (invoice data and receipts) can be exported from MOCO and then imported into BMD by your accounts team or tax adviser. The structured invoice data (CSV) is prepared specifically for BMD.
More information
Tip for importing into BMD
If all receipts are unzipped in the same folder as the CSV file, BMD can assign the receipts automatically.
Abacus
For companies in Switzerland
MOCO exports invoices for Abacus as an optimised zip file (XML + PDF receipts). You can upload the zip file directly into Abacus.
More information
MOCO exports invoices for Abacus as an optimised zip file (XML + PDF receipts). You can upload the zip file directly into Abacus.
More information
Banana (CSV)
For sole traders and small businesses in Switzerland
This integration makes your workflow simpler. Using the MOCO file interface, you can export invoice data in the right format for Banana, and then transfer it into Banana via copy and paste.
Banana accounting option: setup and workflow
This integration makes your workflow simpler. Using the MOCO file interface, you can export invoice data in the right format for Banana, and then transfer it into Banana via copy and paste.
Banana accounting option: setup and workflow
Bexio
For Swiss companies using bexio for accounting
MOCO prepares your invoices in an accounting-friendly way: accounts, VAT codes, and other parameters are recorded directly in MOCO and passed to bexio on export. You continue to manage open receivables, payments, reminders, and open item lists in bexio as usual, while projects, time tracking, and invoicing remain in MOCO.
The direct interface to bexio is provided by our integration partner leanrun ag.
Details on the bexio integration
Xero
For small businesses in the United Kingdom looking for streamlined cloud accounting
With the Xero integration, you can transfer incoming and outgoing invoices from MOCO to Xero as journal entries with a single click, without manual steps or duplicate entry. Exported invoices are automatically locked, keeping project work and accounting in sync.
Details on the Xero integration
With the Xero integration, you can transfer incoming and outgoing invoices from MOCO to Xero as journal entries with a single click, without manual steps or duplicate entry. Exported invoices are automatically locked, keeping project work and accounting in sync.
Details on the Xero integration
QuickBooks
For growing businesses in the United Kingdom that need advanced business and AI tools
MOCO passes prepared incoming and outgoing invoices directly to QuickBooks as journal entries, reducing data entry and potential errors. In QuickBooks, you can also use automation, reporting, and other business tools, while projects, time tracking, and invoicing are managed in MOCO.
Details on the QuickBooks integration
Next Steps
After you’ve selected the accounting option, agree the accounts, etc. with your accounts team. MOCO is then ready for the accounting export.
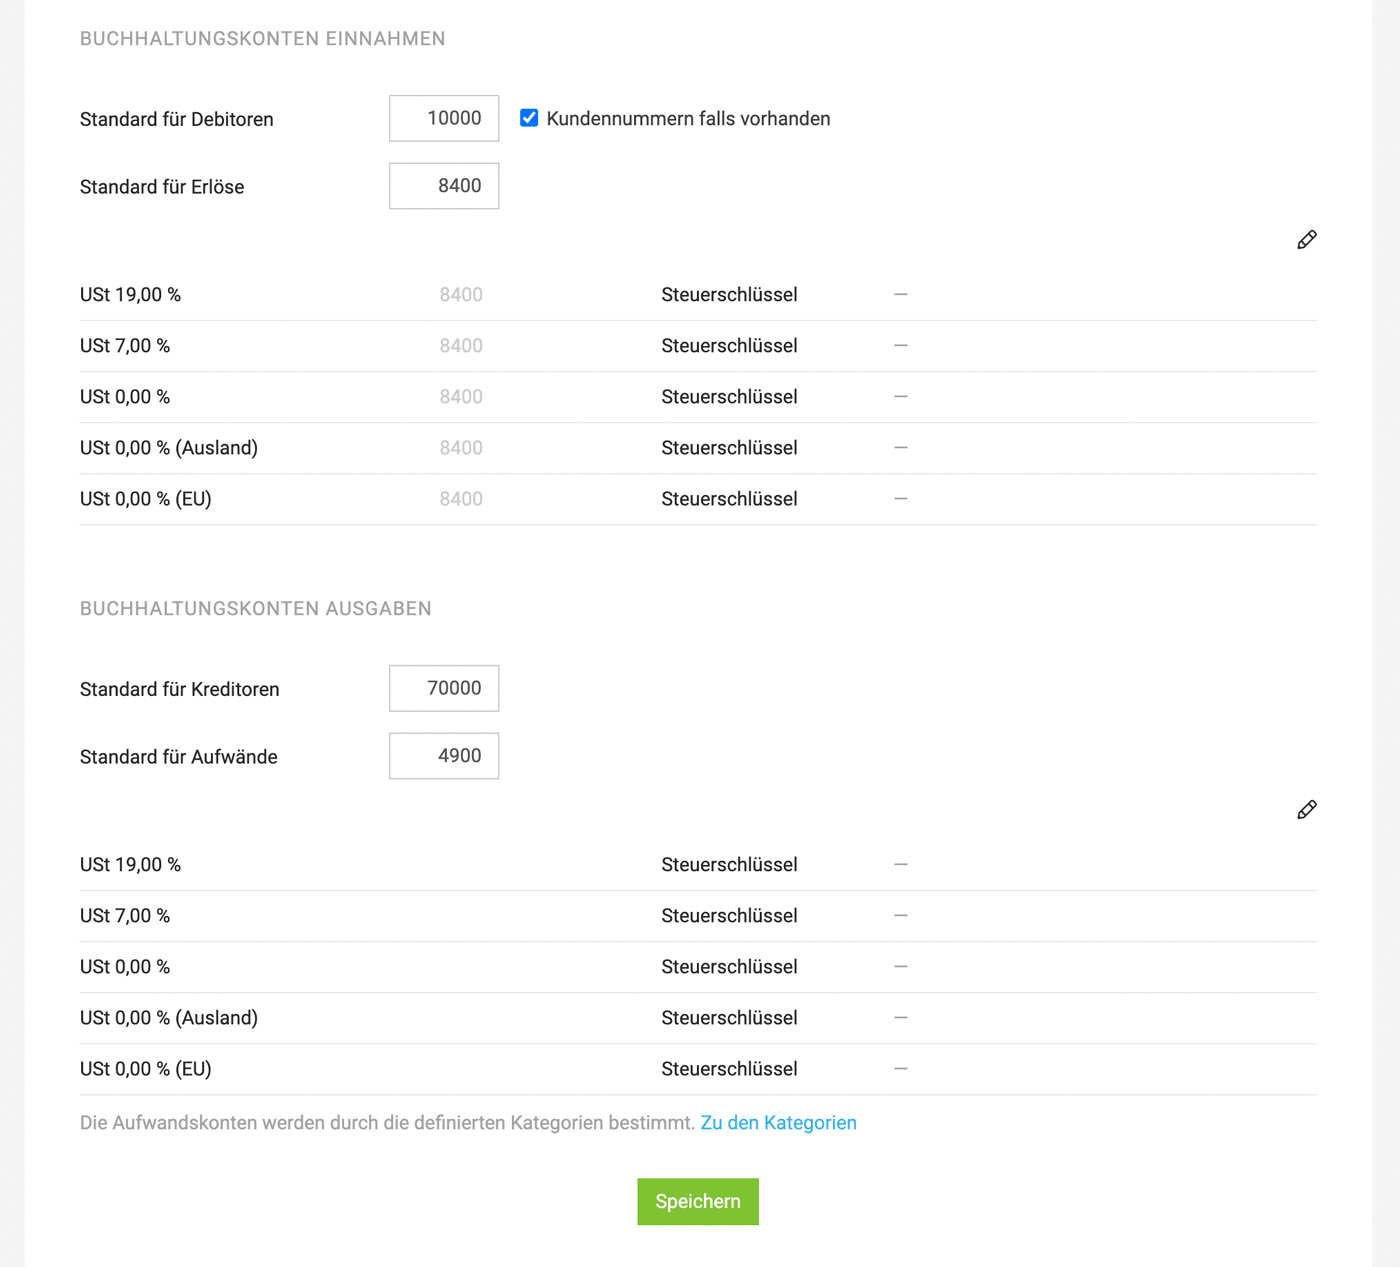
General: Default Accounts and Tax Codes
Under "General," you enter the default accounts that should act as a fallback.
Default Debtors
Default Debtors
If you select "Client numbers if available," the client number is set as the default. The client number can be managed automatically or manually.
Revenue Accounts / Tax Codes
Enter accounts and codes for the tax rates.
Revenue Accounts / Tax Codes
Enter accounts and codes for the tax rates.
Important to prevent taxes from being mistakenly applied when the tax rate is 0%
 (English image not yet available)
(English image not yet available)Accounts Receivable
Settings > Accounting > Accounts Receivable
Getting Started & Standards
Activate the accounting section under "General". Only then will you be prompted with accounts receivable details in MOCO.
Select the default account under "General". This can always be overridden.
Import MOCO account numbers to get started
This can be done via the company import
Import MOCO account numbers to get started
This can be done via the company import
Account numbers or accounts receivable can be managed or changed here in the settings and in three other locations
1. With the Client
Directly when creating the supplier or later via "Edit" (note the blue link "More options").
2. In the Accounting Section (Billing > Accounting > Accounts)
Here you have the list mirrored from the settings. By clicking on the "Default Account" filter (2), you can see which clients still have the set default account as a fallback (see above). The list is also sortable in ascending and descending order (1). This makes it easy to quickly identify which accounts receivable might still be missing. They can be set directly here by double-clicking on "Account" (3).
 (English image not yet available)
3. Directly before the accounting export
Note: This change is only saved for the specific purchase and does not set the number for the client.
Directly when creating the supplier or later via "Edit" (note the blue link "More options").
2. In the Accounting Section (Billing > Accounting > Accounts)
Here you have the list mirrored from the settings. By clicking on the "Default Account" filter (2), you can see which clients still have the set default account as a fallback (see above). The list is also sortable in ascending and descending order (1). This makes it easy to quickly identify which accounts receivable might still be missing. They can be set directly here by double-clicking on "Account" (3).
(English image not yet available)3. Directly before the accounting export
Note: This change is only saved for the specific purchase and does not set the number for the client.
Creditors
Settings > Accounting > Creditors
Start & Standards
Enter Default Account
Select the default account under Accounting > General, which will be automatically set when no supplier is chosen for an expenditure (= Fallback) or if no creditor number is recorded for the supplier.
Import Creditor Numbers when Starting with MOCO
This can be done via the Company Import
Select the default account under Accounting > General, which will be automatically set when no supplier is chosen for an expenditure (= Fallback) or if no creditor number is recorded for the supplier.
Import Creditor Numbers when Starting with MOCO
This can be done via the Company Import
Creditor numbers or accounts can be managed or changed here in the settings and in three other places
MOCO assumes that creditor numbers are assigned outside of MOCO – usually through accounting. They can be entered directly when creating a supplier or set later. Creditor numbers can be manually managed in the following places:
1. At the Supplier
Directly when creating the supplier or later via "Edit" (note the blue link "More Options").
2. In the Accounting Area (Expenditures > Accounting > Accounts)
Here you have the list mirrored from the settings. By clicking on the "Default Account" filter, you can see which suppliers still have the set default account as a fallback (see above). The list can also be sorted in ascending or descending order. This allows you to quickly find out which creditor accounts may still be missing. They can be set directly here by double-clicking on "Account".
 (English image not yet available)
3. Directly before Export
As a last option, you can overwrite the numbers directly in the list before export. Note: This change is only saved for the specific expenditure and does not set the number for the supplier.
Automatically Assign Creditor Numbers
Please contact us if you would prefer this option – a larger demand will directly influence further development.
Revenue
Settings > Accounting > Revenue
Apply Categories as a Framework Across All Services
Your Framework Across All Services
You can name services however you like. For example, they can be renamed within projects or defined freely in quotes. Categories let you apply a consistent framework across all services. Using this framework, you can analyse revenue and, if needed, pass on cost centre and revenue account details to Accounting.
Enable and Set Up Categories
Once the option is enabled, each account can decide how to use service categorisation and which of the three levels are relevant for your business.
Assign to Services
You assign the saved categories to services via the icon label on the services. You can assign them anywhere and, once set, they carry through to the invoice. If needed, you can also overwrite the assignment at any step up to the invoice.
 (English image not yet available)
Assign to Services
You assign the saved categories to services via the icon label on the services. You can assign them anywhere and, once set, they carry through to the invoice. If needed, you can also overwrite the assignment at any step up to the invoice.
(English image not yet available)Category
Categories (1) can be defined without any additional details. This allows you to analyse revenue easily by category (via the standard invoice export, even without using the Accounting area).
Accounting: Invoice line items are grouped by category, and a separate posting is created for each group. You can see this in MOCO under "Billing" > "Accounting" via the tooltip:
.png "Erlöse Kategorien Tooltip") (English image not yet available)
(English image not yet available)
Accounting: Invoice line items are grouped by category, and a separate posting is created for each group. You can see this in MOCO under "Billing" > "Accounting" via the tooltip:
(English image not yet available) Account
Decide whether you want to record revenue accounts (2) for pre-accounting. This is an additional level available to you, alongside categories, for accounting preparation. Saved revenue accounts are passed on to Accounting (otherwise, the default account is used).
Cost Centre
If you define cost centres for internal controlling, store your cost centres (3) for the categories (1). Saved cost centres can be transferred to KOST1 or KOST2 in Accounting by selecting the type "Service (Category Cost Centre)". Cost Centre Settings
Revenue Account Per Invoice
You can also set the revenue account per invoice before exporting to Accounting (under Billing > Accounting).
Workaround Using Labels:
The labels used to tag/categorise invoices are also available in the Accounting area (filtering in the page menu + in manual export).
Workaround Using Labels:
The labels used to tag/categorise invoices are also available in the Accounting area (filtering in the page menu + in manual export).
Expenditures
Categorise Expenditure Items & Assign Expense Accounts
Settings > Accounting > Expenditures
Analyse by Category
Receipts recorded under Expenditures can be categorised at the item level and analysed by category. However, the item level is generally more relevant for accounting expense accounts. For straightforward analysis at the expenditure level and cost centres, we recommend using Budgets.
The fallback is always "Standard for Expenditures"
In the settings under Accounting > General, you select the default account that is set when no expense accounts are recorded.
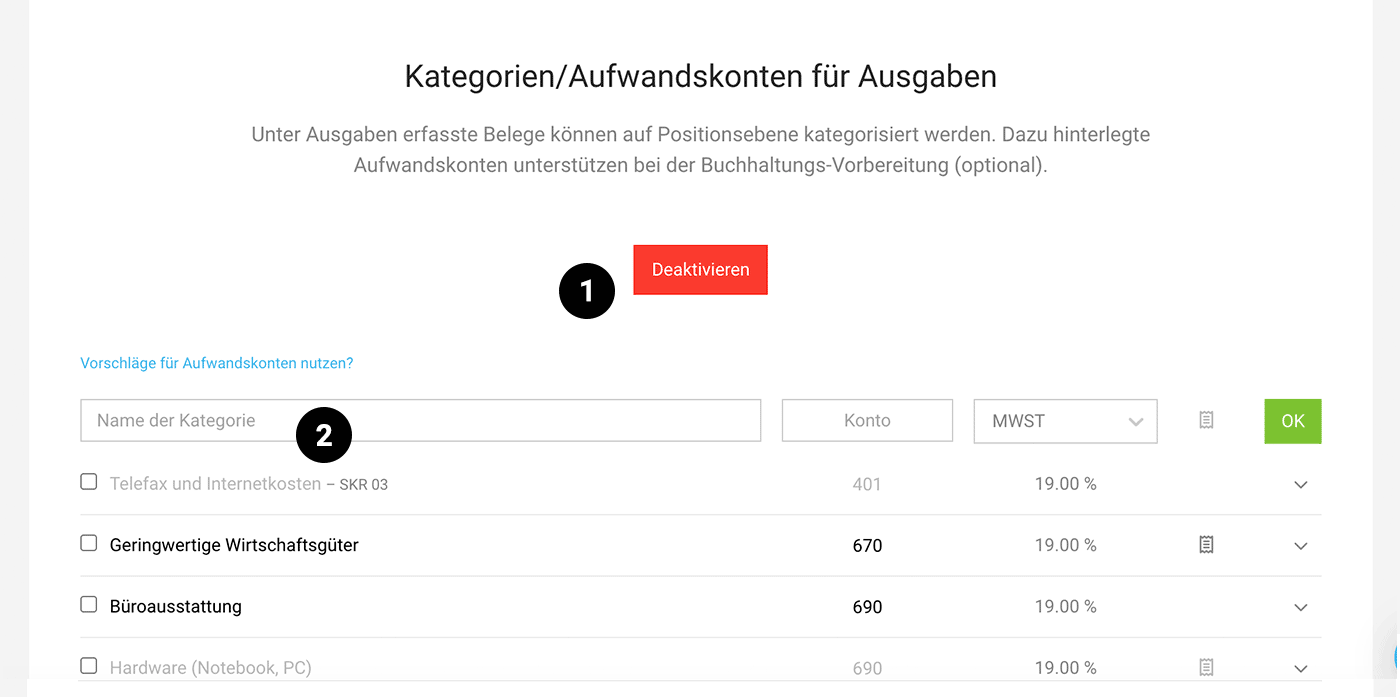
Activate and Record Categories
After activation (1), you record the categories (2) and, if needed, can fill in account suggestions (e.g., SKR 03 or SKR 04) via the blue link "Use suggestions for expense accounts?". The chosen standard tax rate is automatically preselected when a category is chosen.
Activate and Record Categories
After activation (1), you record the categories (2) and, if needed, can fill in account suggestions (e.g., SKR 03 or SKR 04) via the blue link "Use suggestions for expense accounts?". The chosen standard tax rate is automatically preselected when a category is chosen.
 (English image not yet available)
Cost Centres
Settings > Accounting > Cost Centres
You can choose which details should be transferred to accounting for KOST1 and KOST 2:
 (English image not yet available)
(English image not yet available)Outgoing Invoices (Invoices)
a) Services/Invoice Line Items: The stored cost centres that you define here: Settings > Accounting > Revenue
b) Project Number: Transferred if the invoice was created directly for the project.
b) Project Number: Transferred if the invoice was created directly for the project.
c) Custom control via Custom Fields: Via a custom field (type single select or single-line text) on Project or Invoice.
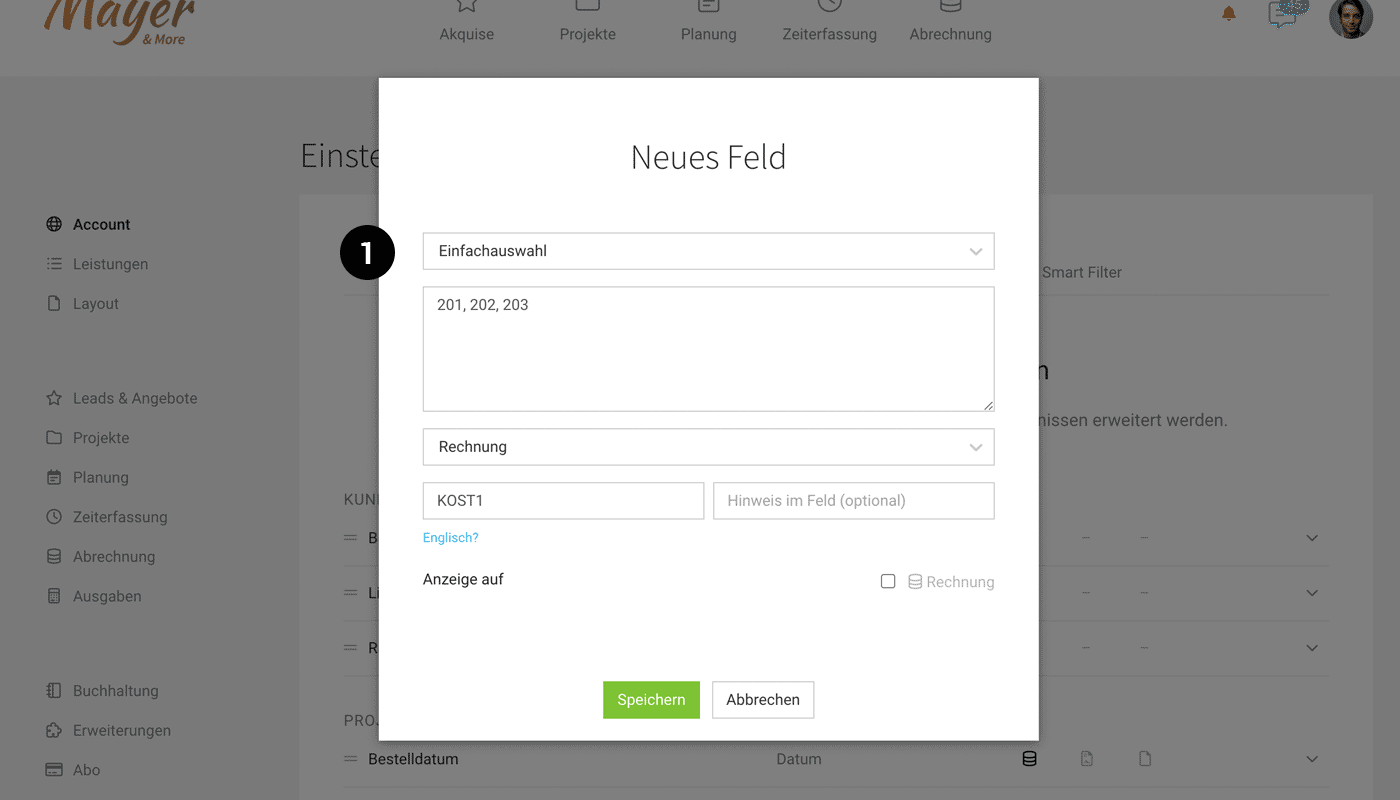
Example for c)
Define individual cost centres using a custom field (1). The field can then be selected in Settings via the mapping dropdown (2). If you then select the required cost centre at the destination (3), it will be transferred with the accounting export.
Example for c)
Define individual cost centres using a custom field (1). The field can then be selected in Settings via the mapping dropdown (2). If you then select the required cost centre at the destination (3), it will be transferred with the accounting export.
 (English image not yet available)
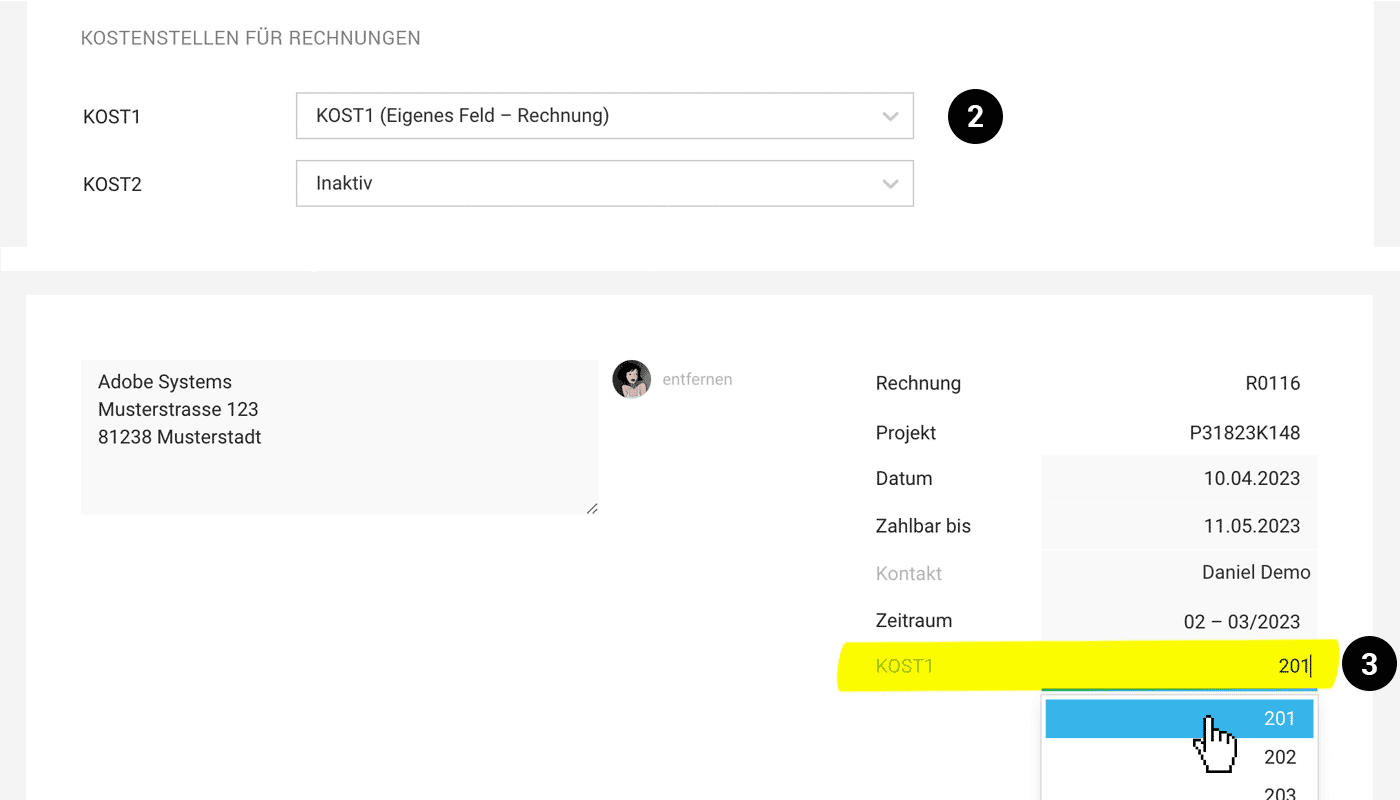 (English image not yet available)
Excel Export Under "Invoices"
With the activated revenue categories and stored cost centres, you can use the export of individual invoice line items under "Billing" (columns "Category", "Cost Centre", and "Revenue Account"). In Excel, you can use this to aggregate and analyse invoice line items by type.
Incoming Invoices (Purchases)
a) Budget: Transferred if budgets with cost centres have been defined.
b) Project Number: Transferred if a purchase line item has been assigned to a project.
c) Custom control via Custom Fields: Via a custom field (type single select or single-line text) on Project or Purchase.
c) Custom control via Custom Fields: Via a custom field (type single select or single-line text) on Project or Purchase.
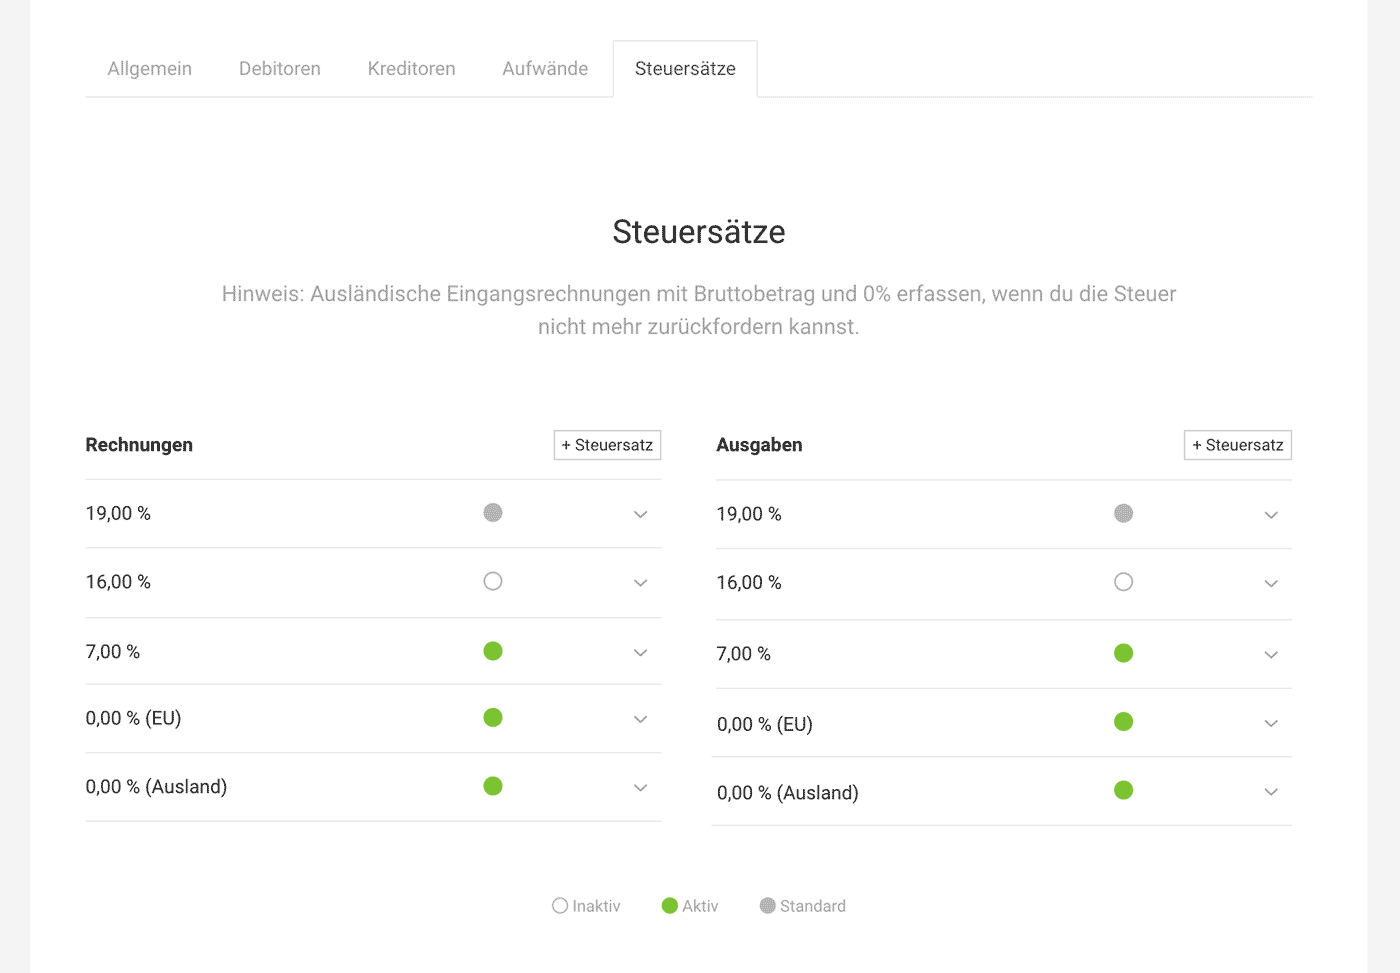
Tax Rates
Settings > Accounting > Tax Rates
Here you’ll find the tax rates that MOCO has added automatically (based on the country selected when creating the account).
Default Tax Rate
A default is preselected here for incoming and outgoing invoices. You can adjust the default tax rate if needed. You can also change it at any time in the company settings or directly on the invoice.
Add Further Tax Rates
Add further tax rates if your business is also registered in another country.
Note: For purchase amounts from abroad and the EU that include tax, always record them using the gross amount with 0% (EU) or 0% (abroad) if you can no longer reclaim the tax.
 (English image not yet available)
Small Business
If you’re a small business and therefore exempt from tax, select the 0% tax rate. You can also add a Standard Note to the tax rate (e.g. for Germany: "Gemäß § 19 UStG wird keine Umsatzsteuer berechnet"), which should be shown automatically on every invoice, and, if you prefer, hide the Tax and Gross lines completely. Check the legally correct wording for your situation with your tax adviser.
Invoices Abroad
For invoice recipients (i.e. clients) abroad, the correct tax rate is usually already preselected. You can also add a Standard Note to the tax rate (e.g. "Steuerschuldnerschaft des Leistungsempfängers" or "VAT due to the recipient"), which should be shown automatically on every invoice, and, if you prefer, hide the Tax and Gross lines completely. Check the legally correct wording for your situation with your tax adviser.