Management
Draft | Approval Workflow | Managing Outstanding Invoices | Sending by Email, Printing | Paid & Ignored | Bank Reconciliation | Tagging & CategorisingDraft
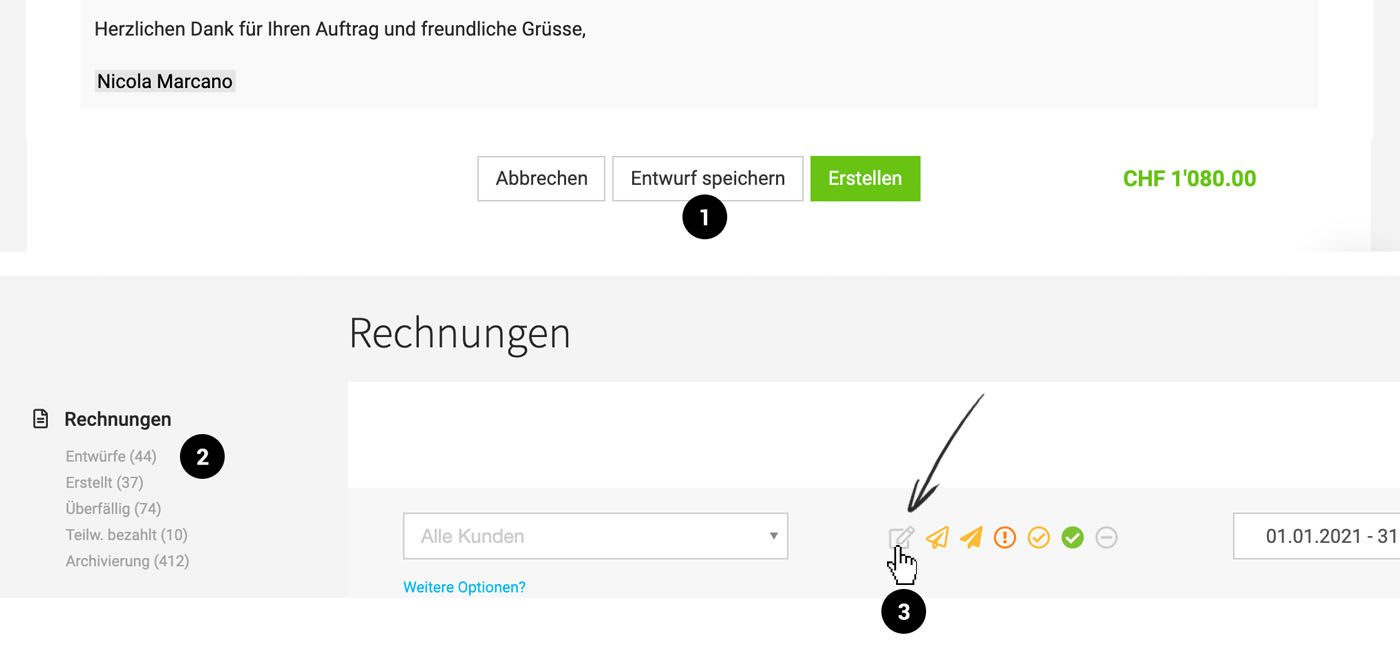
If you select "Save Draft" on the Invoice instead of "Create", you can prepare Invoices without an Invoice number being assigned yet.
Easy to delete & the primary action with restricted Billing permissions
- As a draft, the Invoice does not yet have an Invoice number and can be deleted at any time without any issues. More on deleting Invoices
- If a user has restricted Billing permissions, the primary action when saving the Invoice is the "Draft" button.
Part of the revenue forecast
Draft Invoices count as planned income in the financial reports
 (English image not yet available)
Drafts are listed in the Smart Filter "Drafts" (2). If you also want to filter by drafts, activate the relevant status icon in the filter (3).
Bulk Creation: Drafts
Invoices can be created as drafts using the bulk action.
Convert Drafts into Invoices
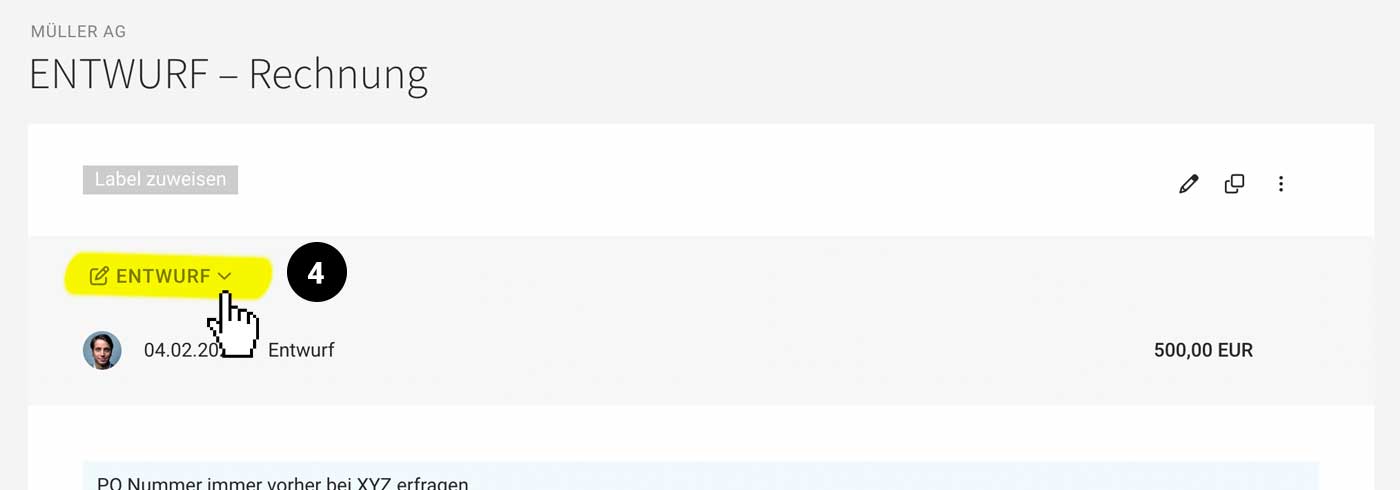
Then go to "Billing" > "Drafts" to review them, and use the bulk action (under "Drafts") to create the Invoices with one click. Alternatively, you can create the Invoice individually by changing its status (Invoice page, top left: 4)
 (English image not yet available)
(English image not yet available)Approval Workflow
Request Approval When You Need It
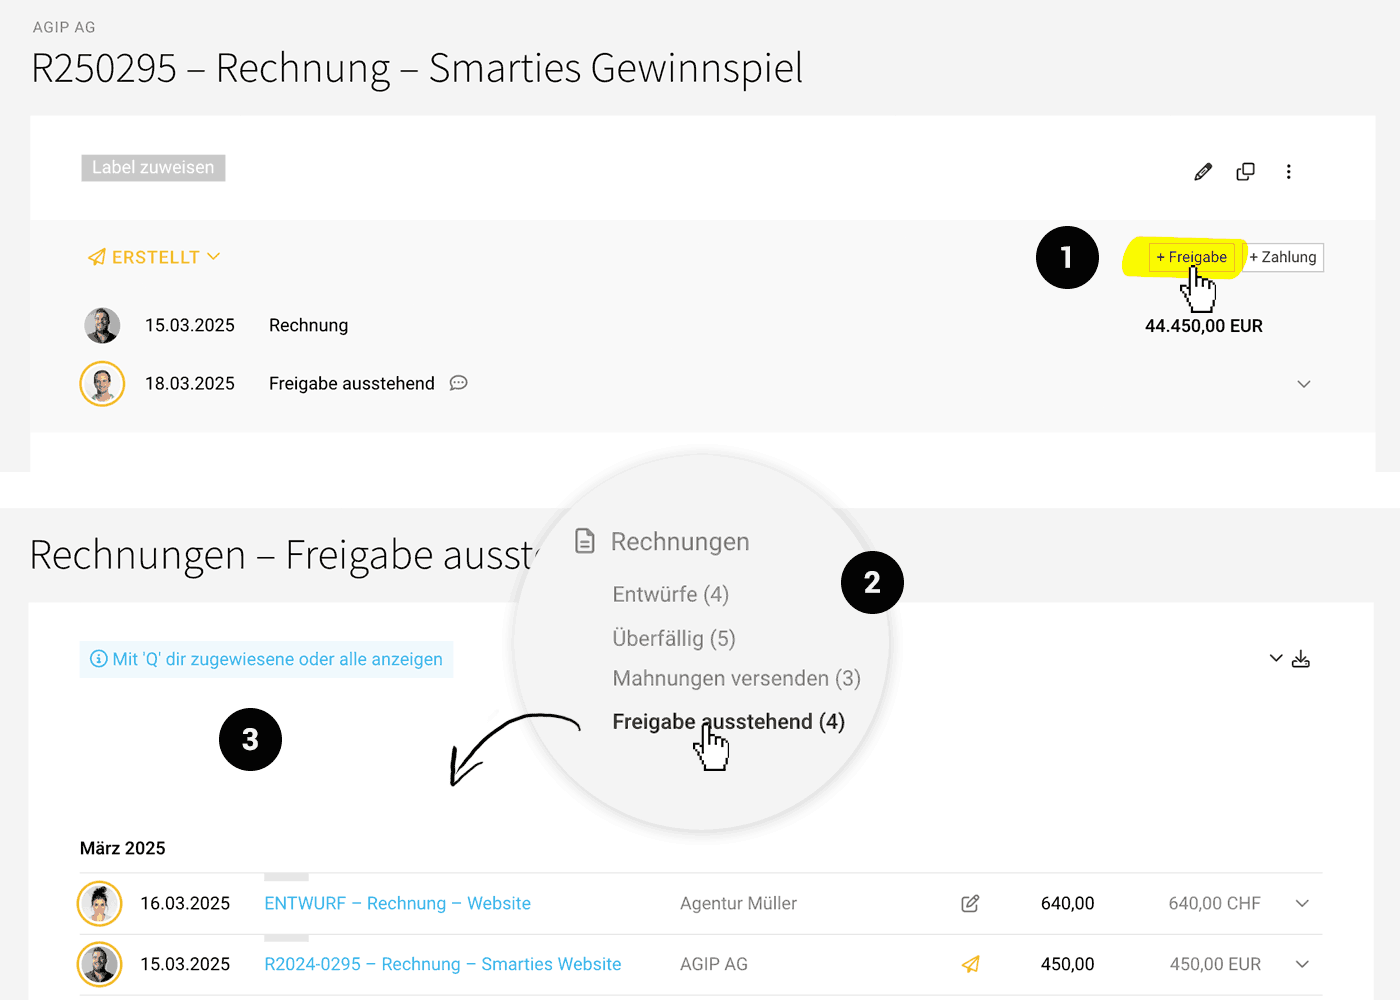
For an Invoice with the status “Draft” or “Created”, you can request approval via the “Approval” button (1).
 (English image not yet available)
The person you address will be notified via the Messages inbox and, depending on your Notification Settings, also by email. The message links directly to the Invoice.
(English image not yet available)The person you address will be notified via the Messages inbox and, depending on your Notification Settings, also by email. The message links directly to the Invoice.
Automatic Approval Request
In Settings under “Billing” > “General”, you can set up or adjust an automation so that, from a minimum amount you define, an approval request is created automatically.
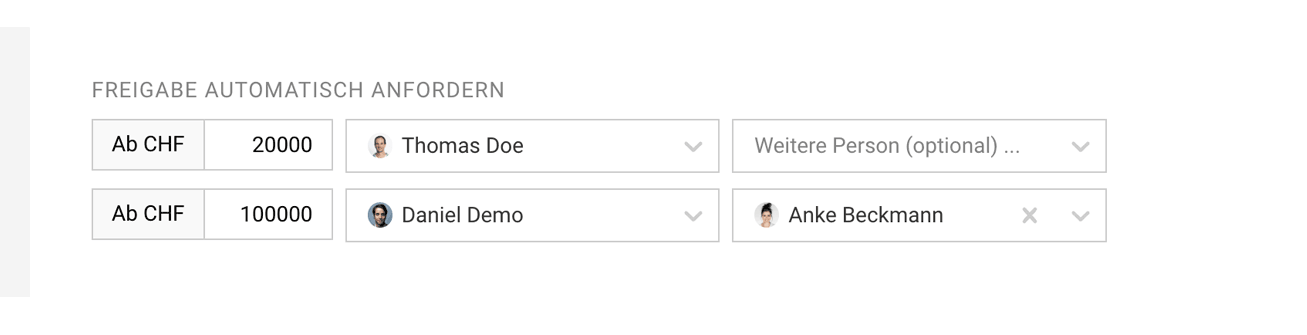 (English image not yet available)
(English image not yet available) Approval Pending
Pending approvals are highlighted in orange in the list. The Smart Filter “Approval Pending” (see 2 above) helps you open all requested approvals. To filter specifically for your own approval requests, you can use the keyboard shortcut “Q” (see 3 above).
Email sending remains disabled until the Invoice is approved.
Email sending remains disabled until the Invoice is approved.
Approve or Reject
In the Invoice detail view, the Invoice can be approved or rejected with a single click (as with Purchases).
If approved, the person who requested approval receives a notification, and the Invoice is marked in green.
If rejected, the requester is also notified, the Invoice is marked in red, and email sending remains disabled. Use the Smart Filter “Approval Rejected” to open all rejected Invoices.
To clarify or correct anything, everyone involved can use the “Comments” feature, including @mention. Invoices can also be flagged at short notice using Labels, making them easy to filter.
You can approve, or delete the approval request, at any time.
If approved, the person who requested approval receives a notification, and the Invoice is marked in green.
If rejected, the requester is also notified, the Invoice is marked in red, and email sending remains disabled. Use the Smart Filter “Approval Rejected” to open all rejected Invoices.
To clarify or correct anything, everyone involved can use the “Comments” feature, including @mention. Invoices can also be flagged at short notice using Labels, making them easy to filter.
You can approve, or delete the approval request, at any time.
General Notes
- Multiple approval requests per Invoice are possible, either in parallel or one after another.
- All actions are documented in the comments below the Invoice.
- All people with full access or restricted access to Billing can be addressed.
- You can adjust notification options in your profile.
- Approval requests can be deleted by: the addressed person, the creator, or someone with full access to Billing.
- Invoices with pending or rejected approval are not offered for accounting export.
Managing Outstanding Invoices
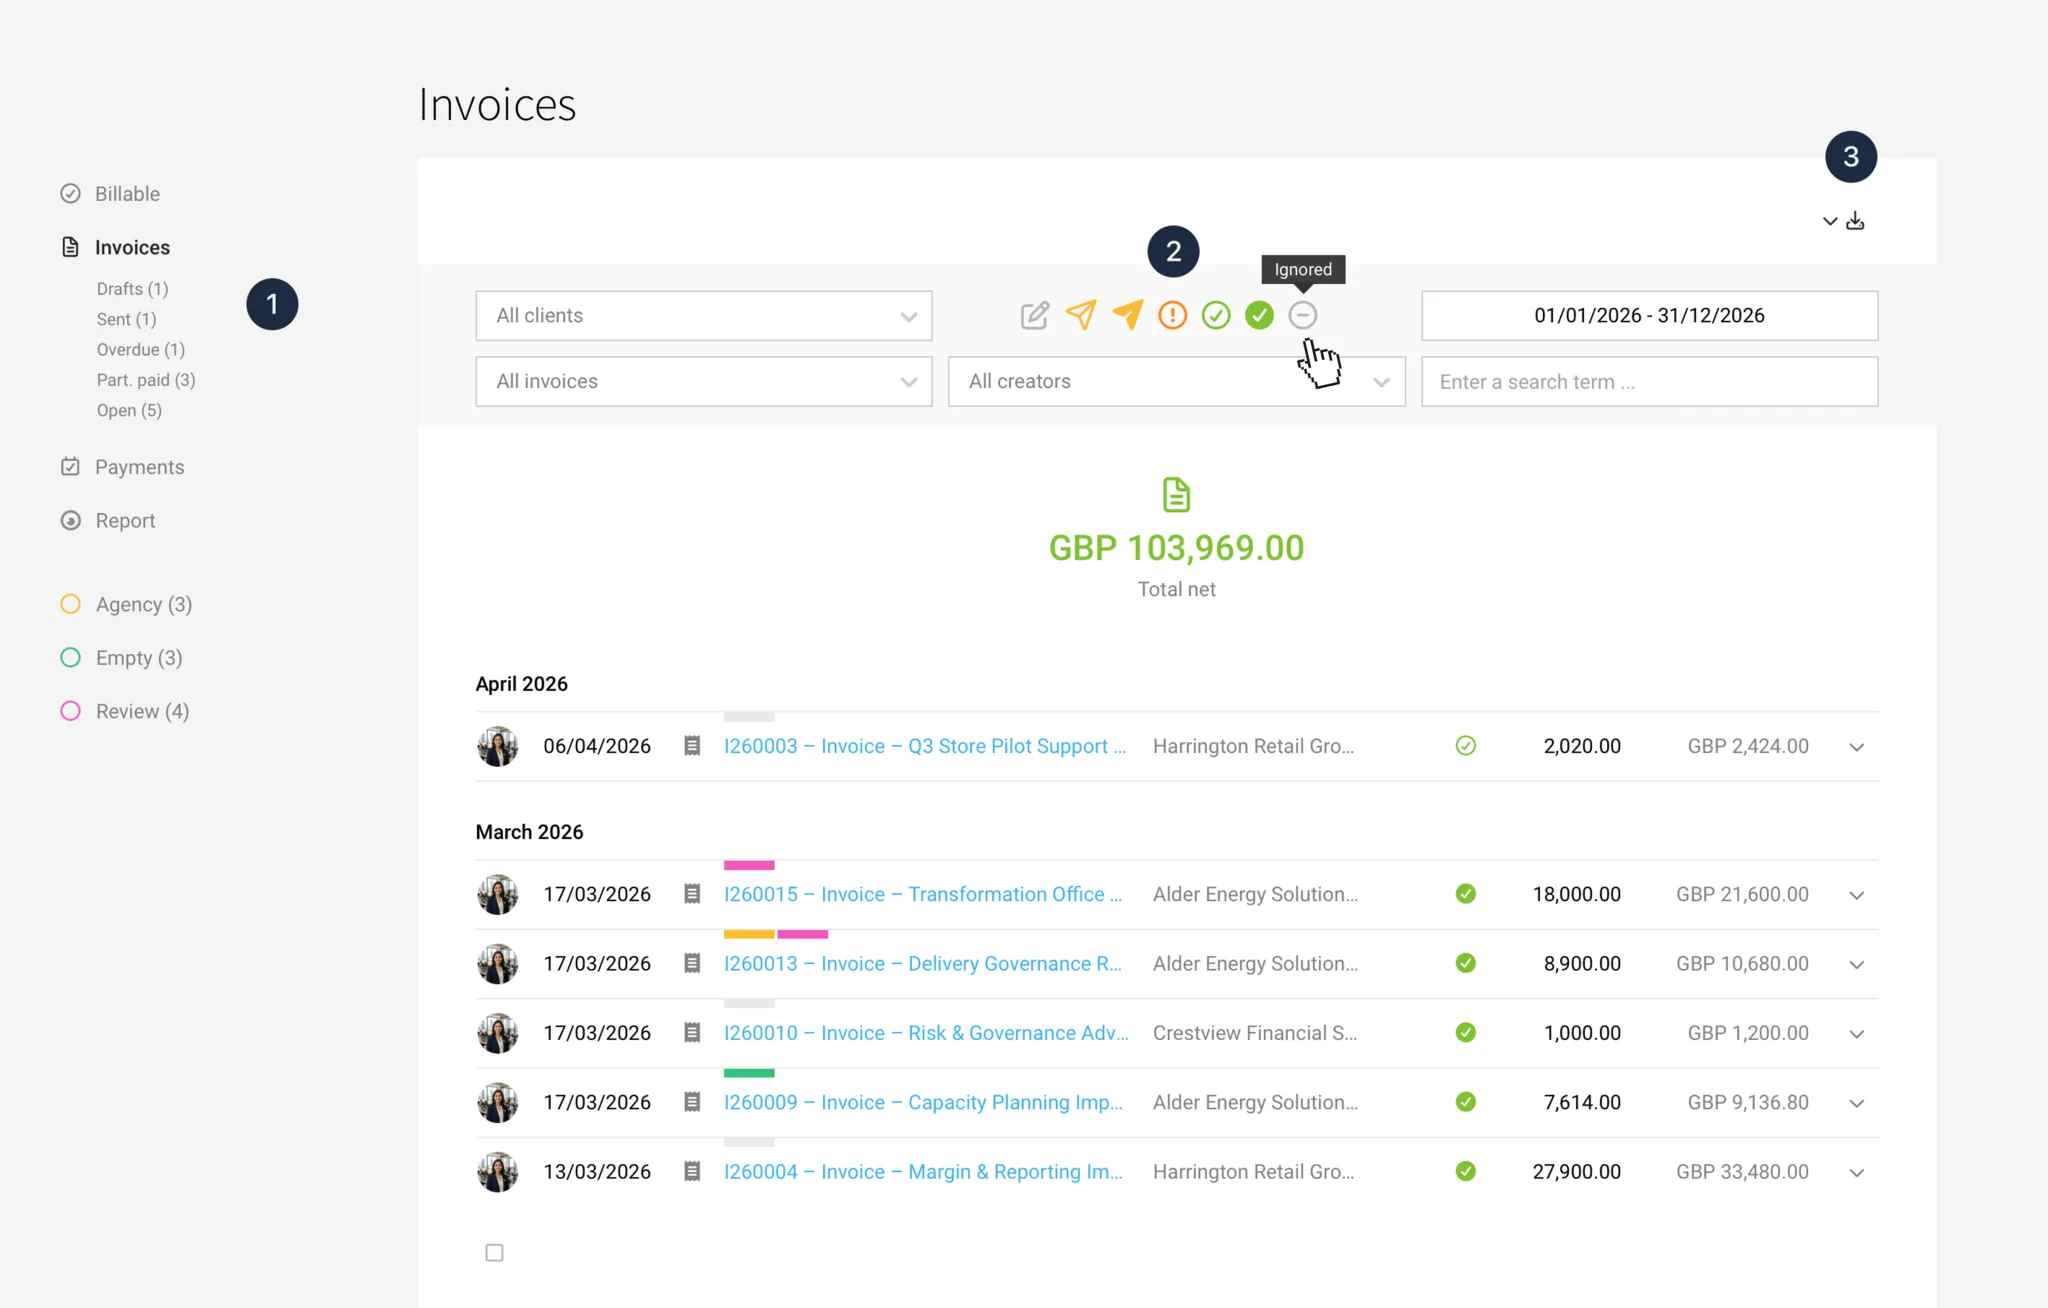
All invoices are listed under "Invoices" (1). In the filter section (2), you can apply custom filters – for example, filter by time period – or include drafts and ignored invoices not considered by the standard filter. A simple export option is available at the top right (3).
» All information on export and accounting exports
Use labels to temporarily mark specific invoices for individual purposes.
» All information on export and accounting exports
Use labels to temporarily mark specific invoices for individual purposes.
Outstanding Invoices
Outstanding invoices can be quickly and specifically displayed using the "Smart Filter":
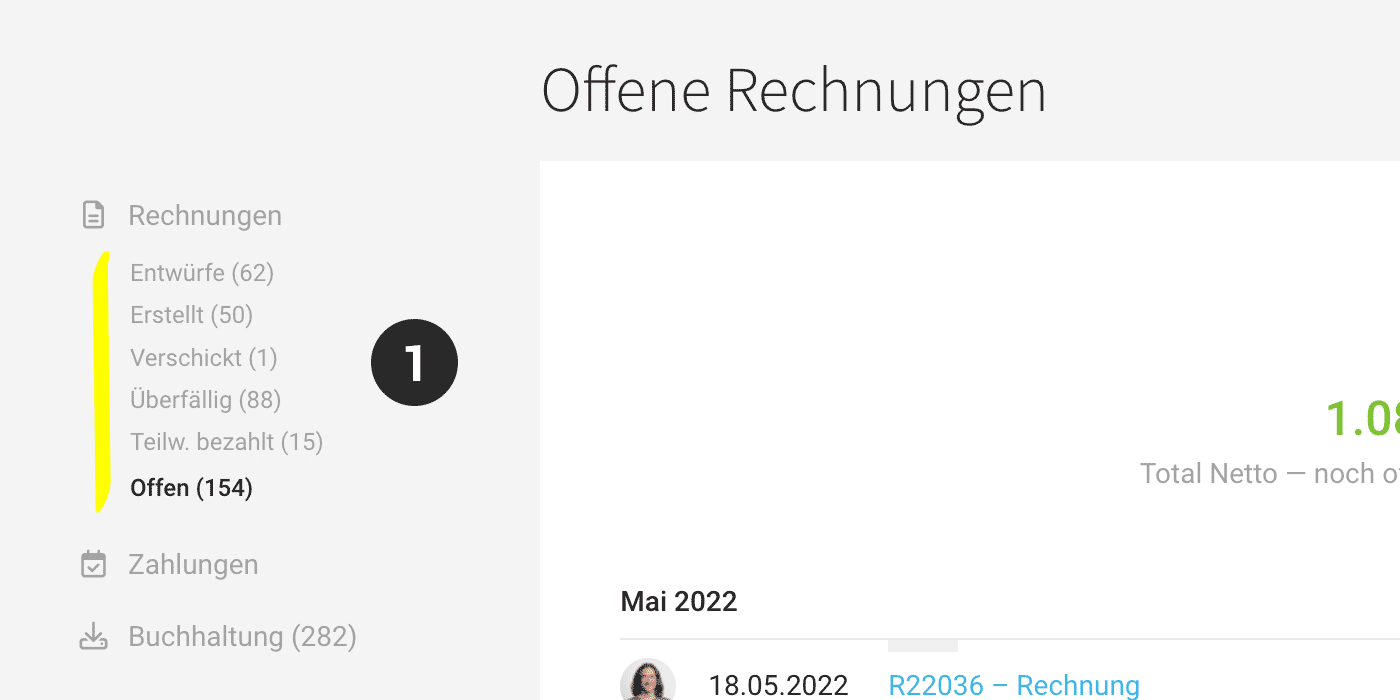 (English image not yet available)
Created
When saving an invoice with "Create", an invoice number is immediately assigned. Subsequent changes can be tracked via the change log (below the invoice view).
(English image not yet available)Created
When saving an invoice with "Create", an invoice number is immediately assigned. Subsequent changes can be tracked via the change log (below the invoice view).
Sent
Invoices sent by email are automatically marked as "Sent". If sending by post, adjust the status manually.
Overdue
Once invoices are sent, MOCO checks daily if an invoice is overdue. The invoice is then categorized under "Overdue". If configured, the issuer receives a notification.
Partially Paid
If the recorded payment does not match the invoice amount, MOCO offers the "Partially Paid" option. Additional payments can be recorded at any time.
For invoices where payments differ due to discounts, the status "Paid" is appropriate. The discrepancies are handled accordingly in the accounting.
Sending by Email, Printing
After saving, the document is displayed using the saved default letterhead and can be downloaded as a PDF or sent. For sending or printing, you can also select an alternative letterhead on the right via the dropdown.
For invoices, you can set and save a different letterhead via the info block at the top right.
Send documents via MOCO or connect your own mail server.
For invoices, you can set and save a different letterhead via the info block at the top right.
Send documents via MOCO or connect your own mail server.
Send Individually
Invoices can be sent directly from the detail view using the “Email” button. If you send individual invoices by post, set the invoice status manually to “Sent”. Overdue checks are only carried out in this status.
Bulk Sending
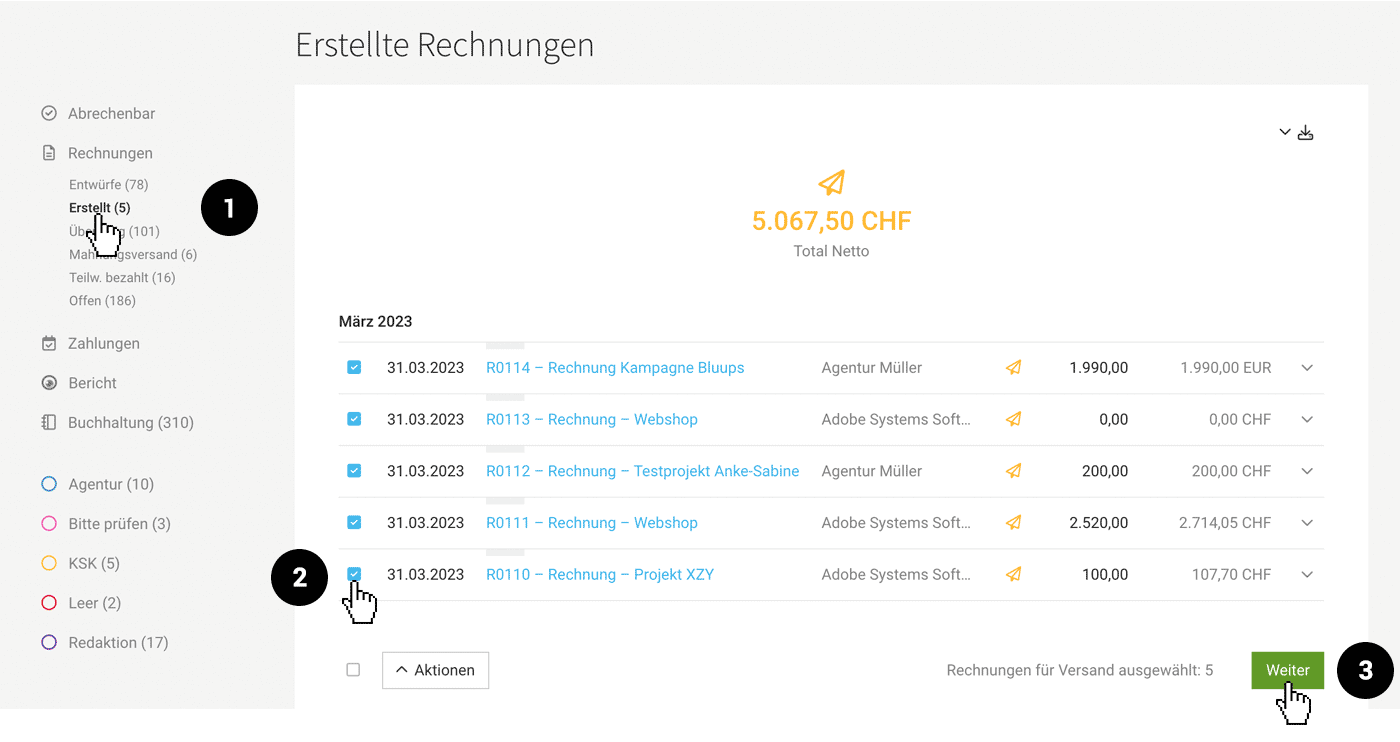
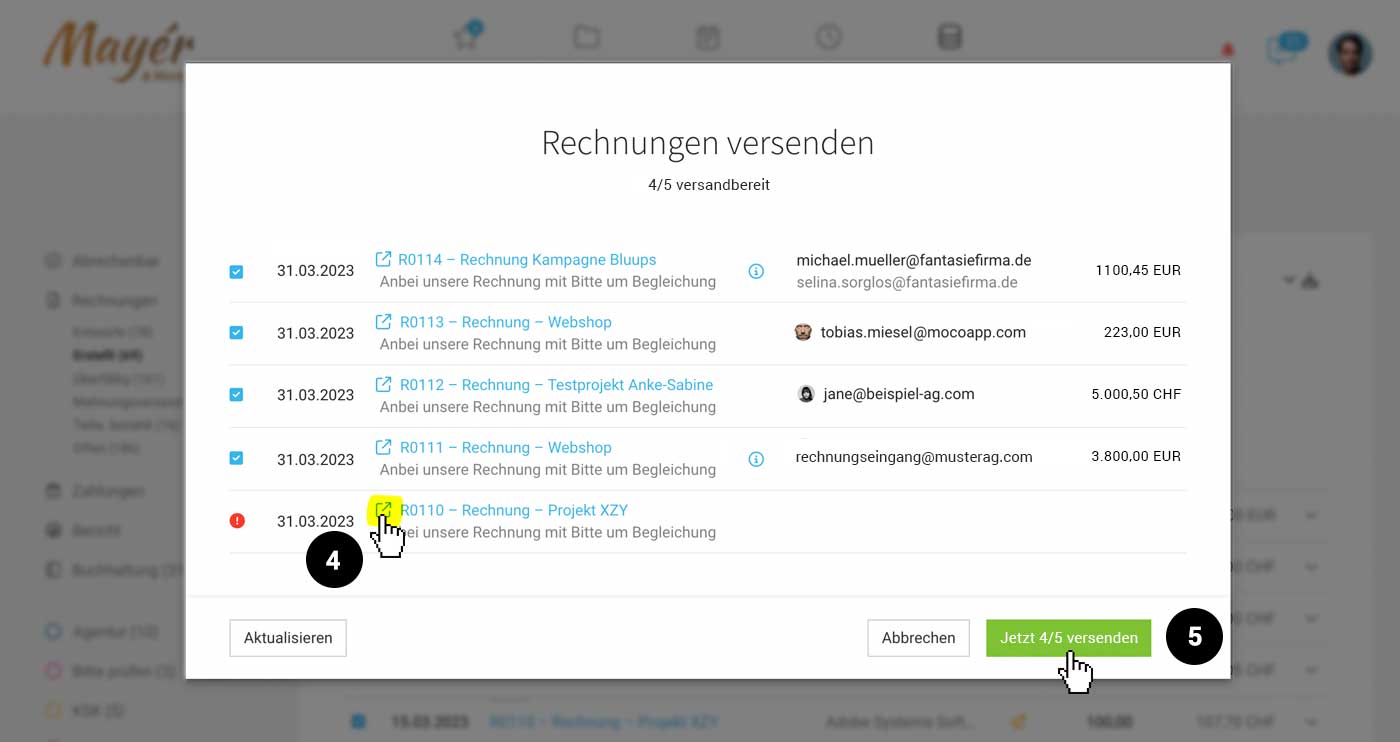
With bulk sending, you can send multiple invoices at once:
1. Under “Billing”, go to the smart filter “Created”
2. Select all invoices or individual ones
3. Click “Next” at the bottom right
4. Check the sending information (icon tooltip with info > Adjust > Update)
5. Confirm sending
 (English image not yet available)
 (English image not yet available)
1. Under “Billing”, go to the smart filter “Created”
2. Select all invoices or individual ones
3. Click “Next” at the bottom right
4. Check the sending information (icon tooltip with info > Adjust > Update)
5. Confirm sending
(English image not yet available)(English image not yet available)Be Well Prepared
For the best possible preparation for bulk sending, check the following:
- Keep the standard email text as neutral as possible (Settings > Billing > Invoices)
- If you use the “Salutation line” variable in the standard email text: adjust the default salutation if needed (Settings > Layout > Labels). If you set a contact in the project billing info or directly when creating the invoice, the salutation line stored for that contact takes priority.
Printing
Under “Print View”, you can select an alternative uploaded letterhead. With the “white” option, you can also easily print the quote on pre-printed letterhead.
Paid & Ignored
Status "Paid"
An Invoice is considered paid once the payment (amount and date) has been recorded against the Invoice. Recording a payment locks the Invoice, so it can no longer be edited.
Status "Ignored"
The status "Ignored" is intended for Invoices that are not, or were not, paid but should not remain open. You can also assign this status manually. When an Invoice is cancelled, it is automatically set to "Ignored" if no payment has been recorded yet. The cancellation invoice is also set to ignored.
These Invoices no longer play a role in accounts receivable management, so they are not included in the default filtering.
If preparatory accounting is enabled, they are offered for the accounting export. If needed, you can also export them separately and not transfer them.
These Invoices no longer play a role in accounts receivable management, so they are not included in the default filtering.
If preparatory accounting is enabled, they are offered for the accounting export. If needed, you can also export them separately and not transfer them.
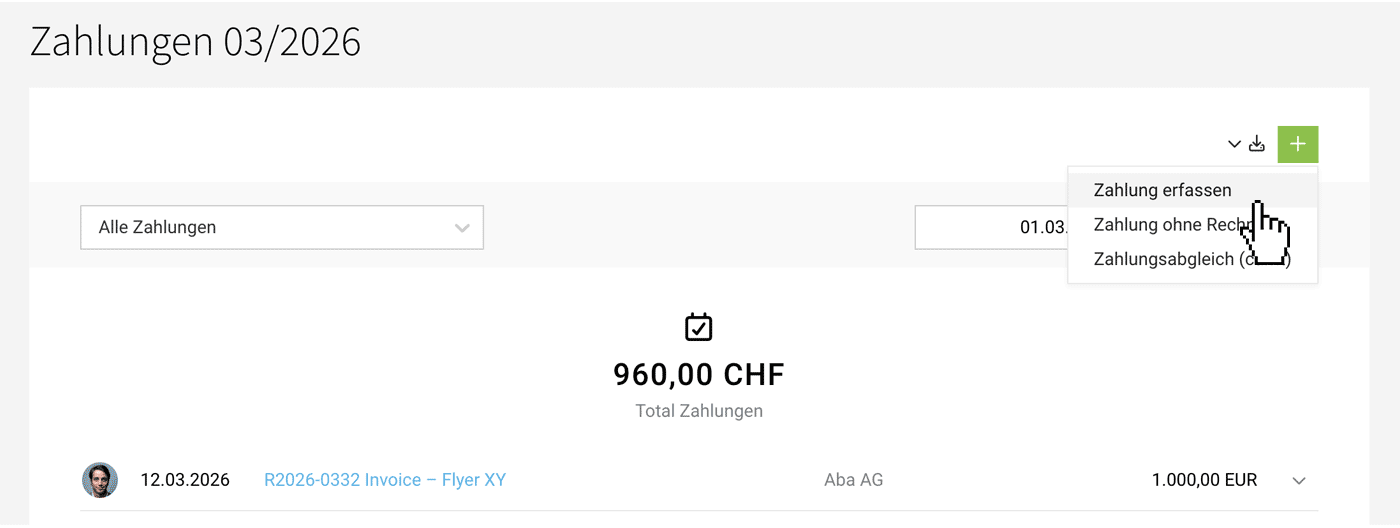
Record a Payment Manually
Payments are recorded under "Billing" > "Payments". Alternatively, you can record the payment directly in the Invoice view at the top right using the "+ Payment" button (see image).
Search Invoices by Reference Number:
You can search MOCO by reference number (QR invoices/ESR) (Shift +7, or under "Billing" in the filter under "More Options").
 (English image not yet available)
Search Invoices by Reference Number:
You can search MOCO by reference number (QR invoices/ESR) (Shift +7, or under "Billing" in the filter under "More Options").
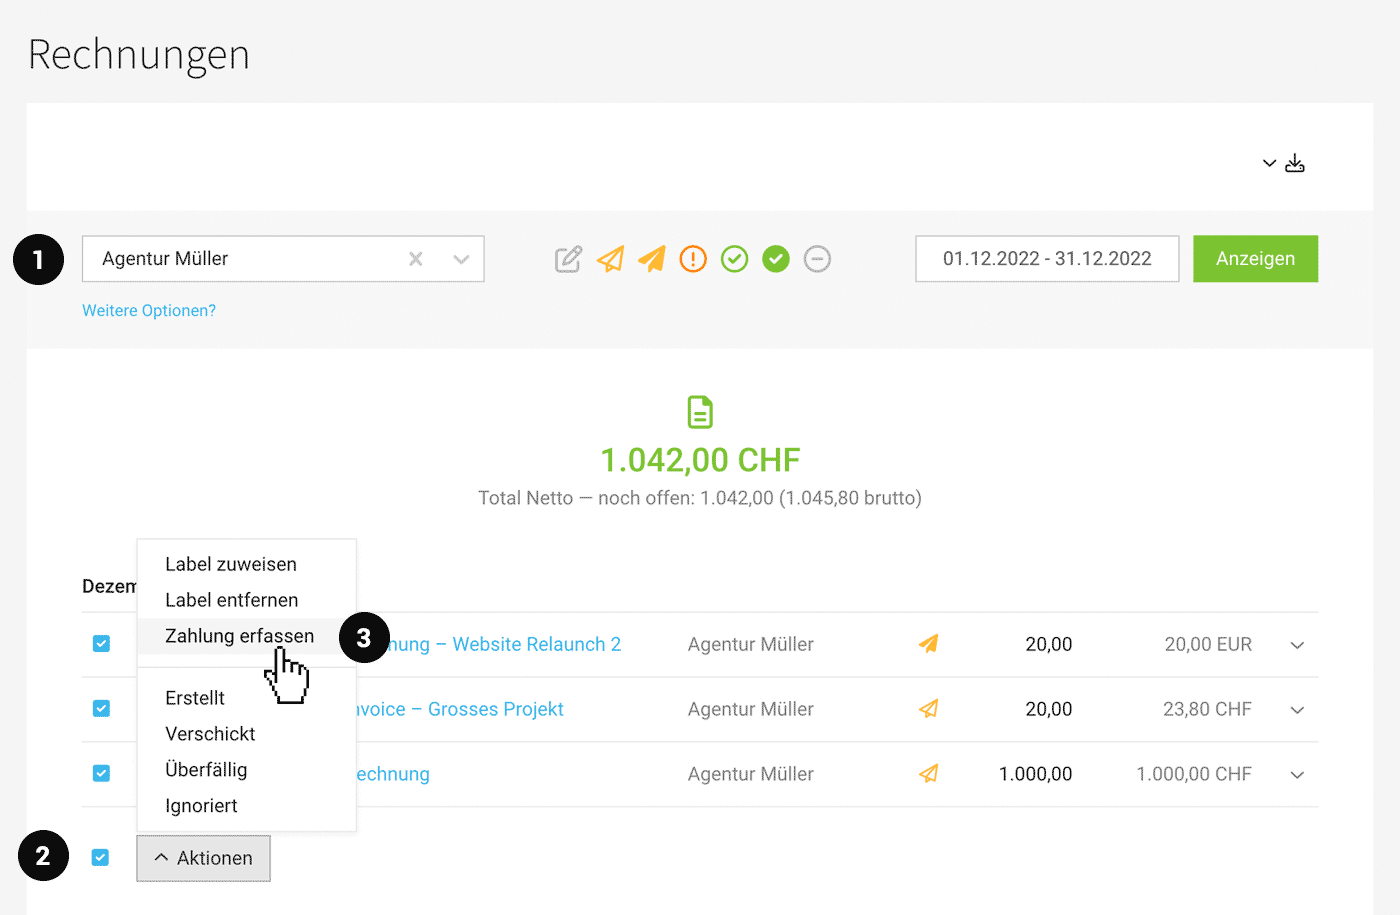
(English image not yet available)Bulk Payment / Mark Multiple Invoices as "Paid"
Select all, or specific, Invoices, then choose the "Record Payment" action.
 (English image not yet available)
(English image not yet available)Bank Reconciliation
Via CAMT File
 (English image not yet available)
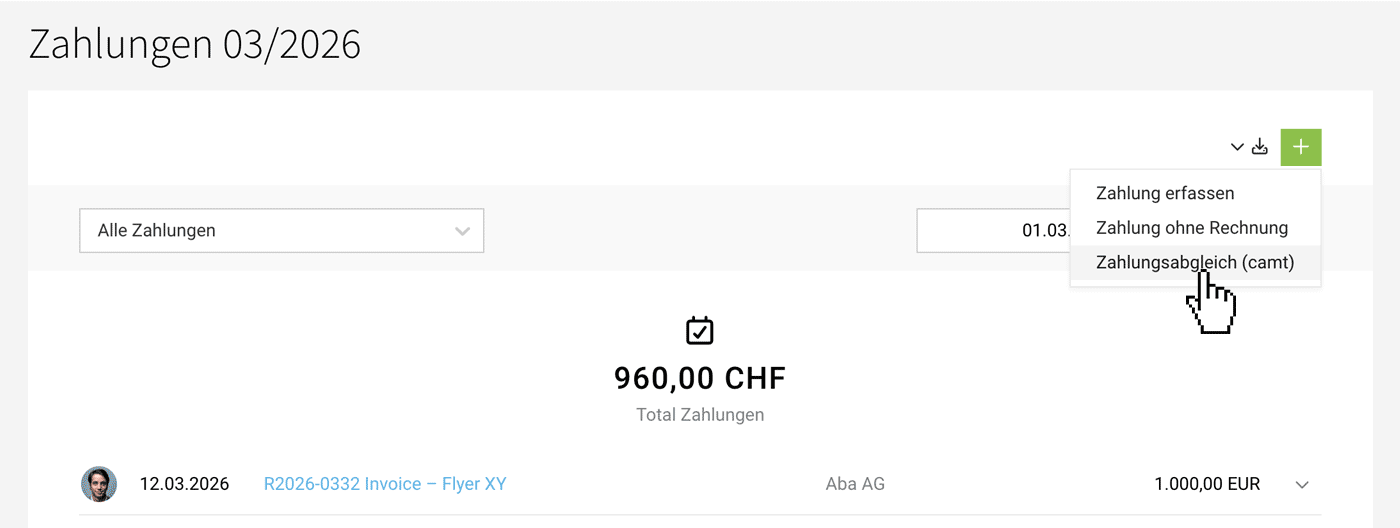
Upload a CAMT file
Under "Payments" (top right), you can upload your bank’s CAMT file (camt.052, camt.053, and camt.054) for automatic payment reconciliation.
For payments captured automatically, an "i" icon shows the payment reference – helping you track and verify what the payment relates to.
Matching via ESR, invoice number, QR code reference
For Swiss accounts, the reference number is used for identification.
For all other accounts, the invoice number must be included in the payment reference so the payment can be assigned to the invoice. If the QR Code for Invoices is enabled, reconciliation can also be ensured via the reference.
Significantly different amount
When reconciling payments via CAMT, MOCO actively flags cases where the gross invoice amount and the payment amount differ too much for a match. Assuming it is a part-payment, MOCO suggests the status "Partially paid". You can easily change this to "Paid".
Direct Bank Connection
You can also reconcile incoming payments directly via the bank connection. You can connect multiple banks (with one or more accounts). Payments for invoices are then captured automatically (and the invoice is marked as paid).
Connect your bank
In Settings, connect your bank(s) and select the accounts.
Connect your bank
In Settings, connect your bank(s) and select the accounts.
Automatic payment reconciliation four times a day
With an active bank connection and at least one selected account, automatic payment reconciliation runs four times a day. You can see an overview of all payments under "Billing" > "Payments".
No older than 3 months
MOCO detects new incoming payments from the moment you activate it. With each reconciliation, all invoices without payments are checked. Only once invoices or payments are older than 3 months are they no longer considered.
The payment reference is key to successful reconciliation
For a payment to be assigned to the correct invoice, the invoice number and/or payment reference must match. For payments captured automatically, this payment reference is shown via an "i" icon – helping you track and verify it.
Assign payments later
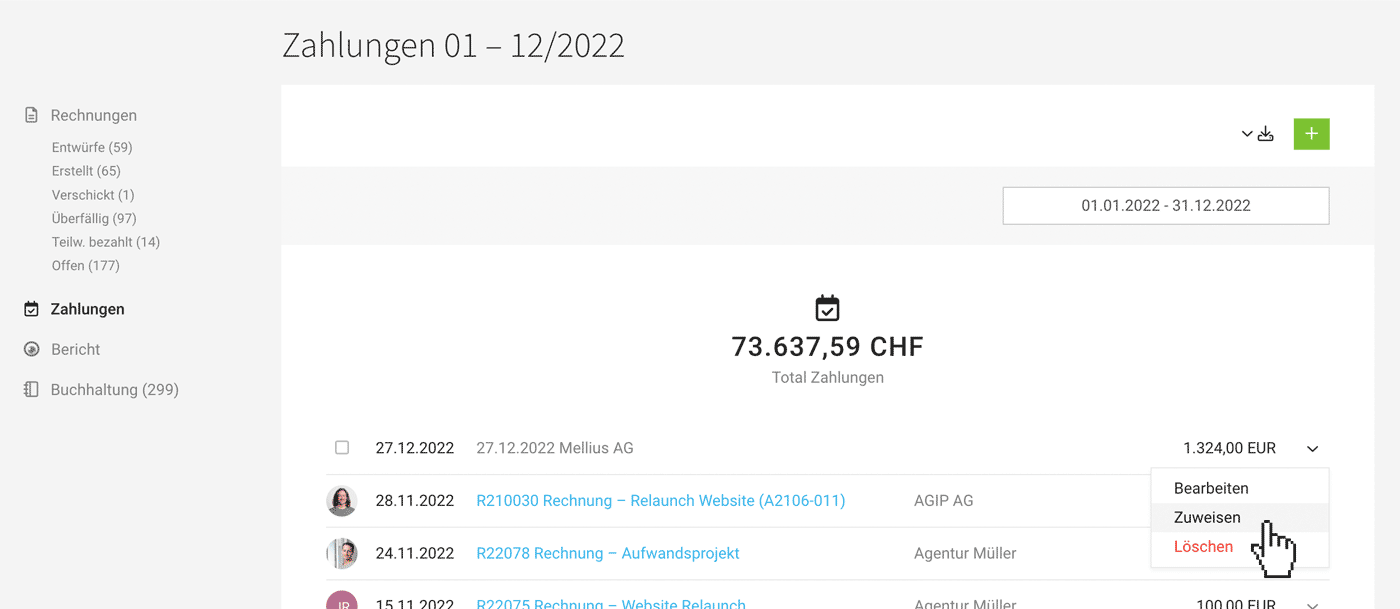
If you choose in Settings to fetch all payments, MOCO will also capture payments that cannot be assigned to an invoice. These are listed under "Billing" > "Payments" and can be assigned to invoices later if needed:
 (English image not yet available)
Other Income
Payments that do not relate to a MOCO sales invoice can simply remain as they are to reflect your actual cashflow. You can also add payments individually at any time.
Outgoing Payments
If you use digital supplier invoice capture, you can also reconcile purchases with outgoing payments.
Tagging & Categorising
Labels
Labels allow you to categorise or temporarily mark invoices. These labels are also included in the Excel export, enabling further custom analyses.
» More about Labels
» More about Labels
Custom Fields
Document information can be extended with Custom Fields (visible or invisible in the PDF). They are part of the export and Accounting Export "Neutral (CSV)".