Proposal Elements
Header & Introduction | Items | Images | Closing Text | Predefining ItemsHeader & Introduction
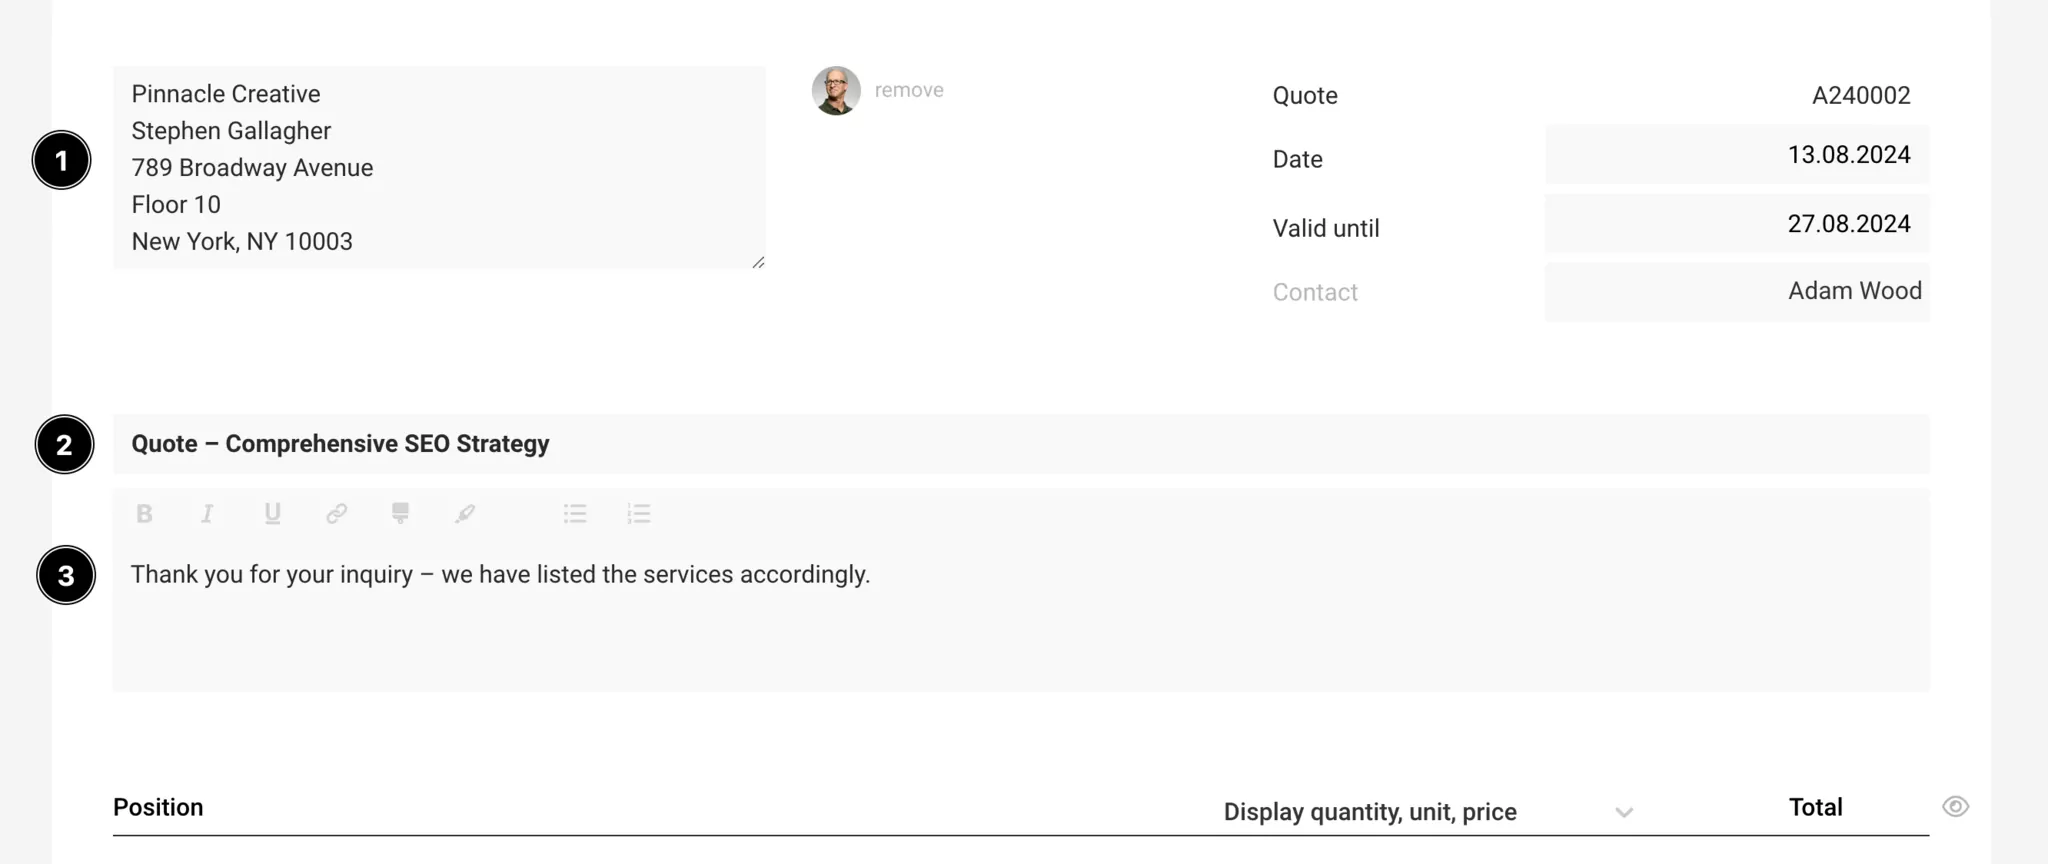
The header includes the recipient and document information (1)
Recipient
MOCO automatically inserts the address that was entered for the customer. Alternatively, a contact for personalization can be selected at the top right.
MOCO automatically inserts the address that was entered for the customer. Alternatively, a contact for personalization can be selected at the top right.
Document information: Standard information about the document is displayed in the proposal in the info block. The information can be shown/hidden or individually supplemented. Font size, width, etc. can be adjusted in the settings.
The content begins with the title and introduction
Title (2)
Name the title as descriptively as possible, as it will play a role later in the proposal list and the file name.
Name the title as descriptively as possible, as it will play a role later in the proposal list and the file name.
Introduction (3)
- The introduction text is similar to a cover letter.
- A standard text with variable can be predefined or the salutation personalized.
- Page breaks can be inserted with three dashes (---). For example, you can insert this at the end of the introduction text if the positions should start on a new page.
Items
The items are fundamentally modular and tabular in structure. The width for descriptions and images can be adjusted independently.
 English image not yet available...
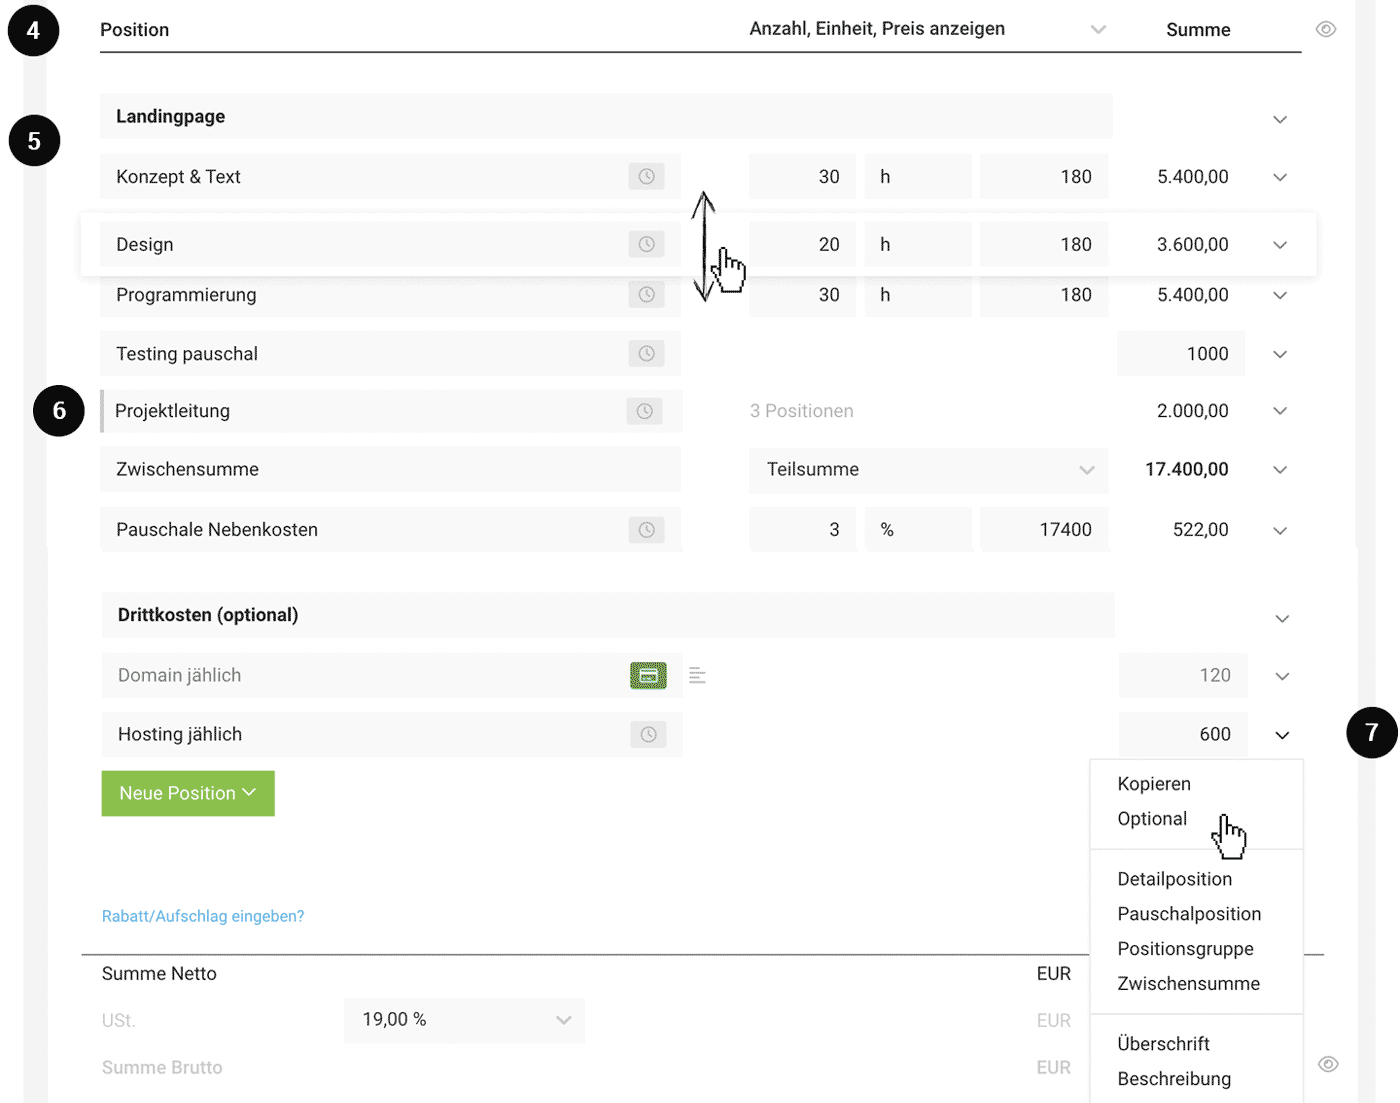
 Table header (4)
The table header is hideable: This allows for a seamless look (e.g., image on the cover page) to be achieved.
Detail columns (= specifications of quantity, unit, unit price when using detailed items) are displayed by default. They can also be hidden by default in the layout settings. It can still be decided on a per-proposal basis (see illustration).
An automatic item numbering can be chosen in the layout settings.
Items (5)
Insert selected items (green button or dropdown on the right). The items can be moved via drag'n'drop.
- Detailed item: Item with automatic calculation and optional display
- Flat-rate item
- Item group: combines several items
- Subtotal: sums up completely or up to the last heading
- Heading
- Description
- Image
- Divider line
- Page break
Optional Items
A detailed or flat-rate item can be set to "optional" via the dropdown on the right (7). Optional items are displayed in gray and are not included in the final total. However, a variable that can be called up via input "{" can be used to specify the net total including options, for example, in the closing text if needed.
Item Group
Combine several items and, for example, only display the sum (6). To do this, add via "+New Item" > "Item Group".
More info in the August 23 update news (the function has been further developed since then)
More info in the August 23 update news (the function has been further developed since then)
Service Types
Service / Additional service
Detailed and flat-rate items are marked by the type "Service" (= usually in-house services – gray label) and "Additional service" (usually external services – dark green label). This type distinction extends from the proposal through the project to the invoice. The service type can be changed by clicking on the label.
Detailed and flat-rate items are marked by the type "Service" (= usually in-house services – gray label) and "Additional service" (usually external services – dark green label). This type distinction extends from the proposal through the project to the invoice. The service type can be changed by clicking on the label.
Individual Discounts, Total Discount, Surcharge
Individual discounts, surcharges (example flat-rate for additional costs (6)), total discount on the proposal (example new customer discount) are possible - as with invoices.
For detailed information see Invoices
For detailed information see Invoices
Total Sum Area
The total sum area is also hideable (eye on the right) – e.g., for various options in a proposal.
Images
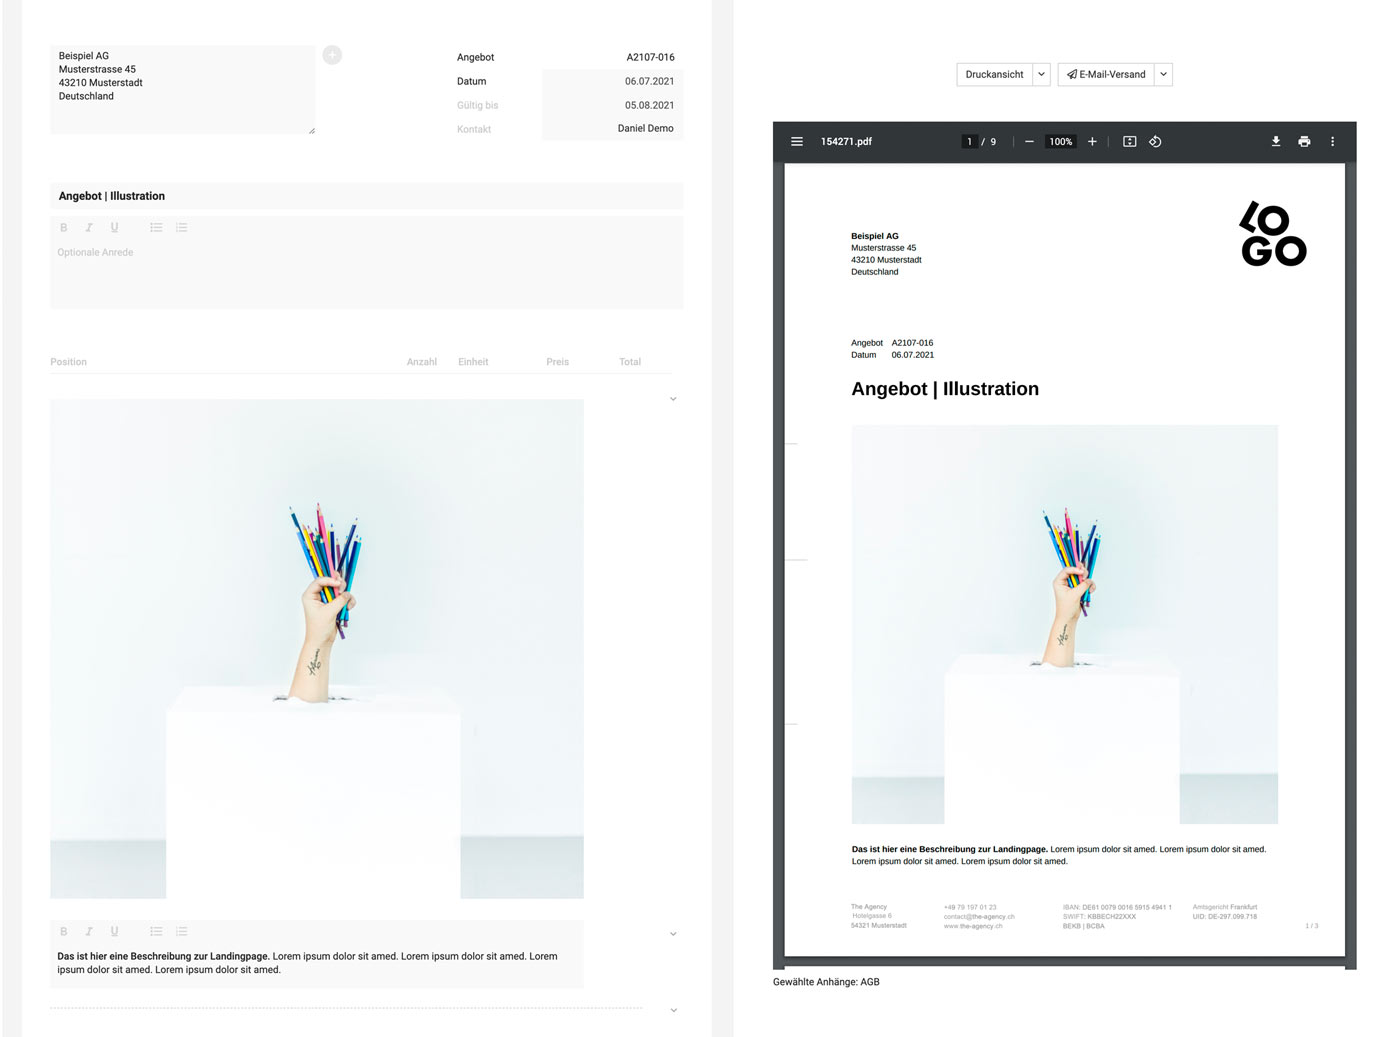
As an element, the "Image" is also available. The maximum width displayed in the PDF is defined via the settings (Layout > General). If a smaller image is inserted, it will be aligned to the left.
A type of cover page can currently be created by hiding the table header, which is usually too rigidly tabular for illustrated proposals. This allows the elements to be used seamlessly. See example Edit mode vs. PDF preview:
 English image not yet available...
In the example, the width for description & images is set to 100%. With page margins of 25 mm, an image size of 160 mm width at 150 dpi & RGB is recommended. This ensures that the proposal can still be printed in the best quality and the data remains reasonably small. Ideally, one creates a template (e.g., in Photoshop) and thus quickly optimizes the images.
A type of cover page can currently be created by hiding the table header, which is usually too rigidly tabular for illustrated proposals. This allows the elements to be used seamlessly. See example Edit mode vs. PDF preview:
English image not yet available...In the example, the width for description & images is set to 100%. With page margins of 25 mm, an image size of 160 mm width at 150 dpi & RGB is recommended. This ensures that the proposal can still be printed in the best quality and the data remains reasonably small. Ideally, one creates a template (e.g., in Photoshop) and thus quickly optimizes the images.
Closing Text
.png) English image not yet available...
English image not yet available...Closing Text (7): Typically, the closing text includes a nice phrase such as "If you have any questions, please feel free to contact me at any time at .... We would greatly appreciate your confirmation of the proposal ... Kind regards ..."
Three dashes (---) can be used to insert page breaks. Here, a standard text including contact details with variables can be predefined.
Proposal Confirmation: can be realized as follows: Proposal confirmation for the customer
Attachments (8): Predefined (e.g., terms and conditions), selectable, and individual attachments are possible
To the attachments
Attachments (8): Predefined (e.g., terms and conditions), selectable, and individual attachments are possible
To the attachments
PDF, Printing, Email Dispatch
After saving, the document is displayed with the deposited standard letterhead and can be downloaded as a PDF or sent.
Print
Under "Print view" you can select an alternative uploaded letterhead. With the selection "white", the proposal can also be printed on pre-printed letterhead.
Email Dispatch
This is done via the "Email Dispatch" button. The email text can be predefined as standard texts with variables.
Under "Print view" you can select an alternative uploaded letterhead. With the selection "white", the proposal can also be printed on pre-printed letterhead.
Email Dispatch
This is done via the "Email Dispatch" button. The email text can be predefined as standard texts with variables.
Predefining Items
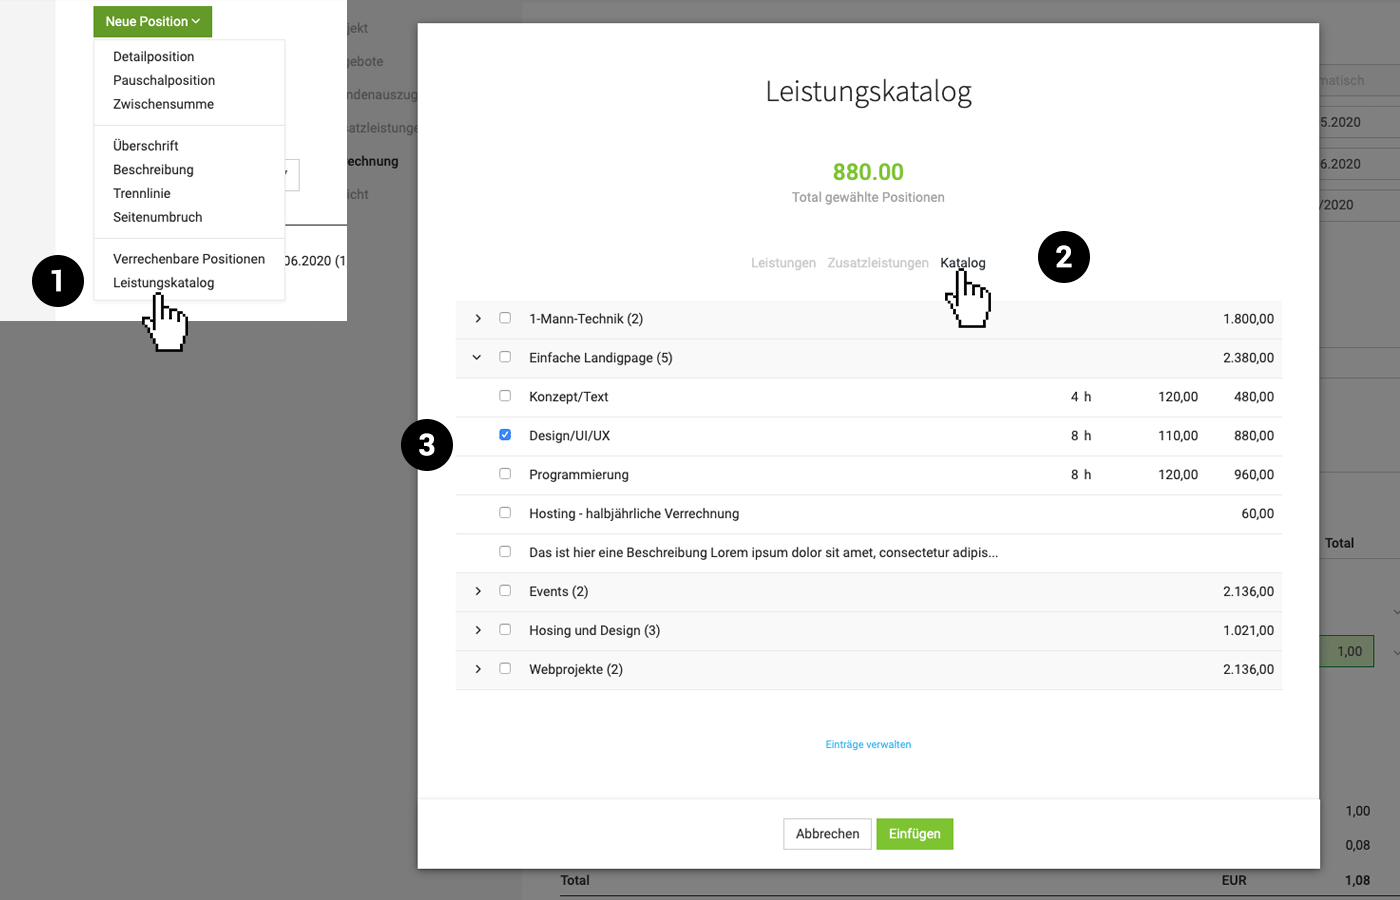
In the Proposal, one can directly access standard services, standard additional services, and the catalog with custom-assembled modules through the service catalog
To do this, select "New Item" from the list and choose "Service Catalog" (1). "Catalog" (2) for the predefined modules and select an entire entry or individual elements to insert (3).
Modules are predefined in the settings > "Services" > "Catalog". Often used blocks or entire checklists can be predefined
Tip: "Proposal Checklists": If you create all the important items for a project in one entry and later add them to a proposal, you can quickly go through and check which items are needed or not needed. The huge advantage is that colleagues who are supposed to create proposals can no longer forget any items in the proposal. Too often in practice, "trivialities" such as hosting are forgotten on the proposal.